How to export a video from MuseScore Studio
The feature arrived in version 4.7, and it takes only a few steps:
- 1Install FFmpeg
MuseScore needs it to write video. If it cannot find FFmpeg, the export window offers to download it or lets you point at your copy. Restart MuseScore if it is not detected right after installing.
- 2Open the export window
Go to File, Export, and choose MP4 video as the format.
- 3Choose the layout
By default, the video uses the layout from Page view. The option to reflow to fit the video’s resolution makes a layout suited to a wide picture.
- 4Export
Set the audio options you want and export. The video plays with the notation following along.
That gives you a video of the score, in MuseScore’s own sound. For a quick share of a new piece, you are done.
Which one do you need?
They do different jobs. MuseScore’s export shows a score on its own playback. SheetVideo makes a video of a performance, with the score in time with whoever is playing.
| SheetVideo | MuseScore export | |
|---|---|---|
| Sound | Your own recording, video or audio | MuseScore’s playback |
| Timing | Follows the performance, rubato and all | Follows the tempo in the file |
| On screen | Your video if you filmed one, the sheet music in the look you pick, and a piano, a neck or falling notes if you want them | The score |
| Shape | Reels and Shorts 9:16, YouTube 16:9, Instagram feed 4:5, square 1:1 | Page view layout, or reflowed to the video’s resolution |
| Set-up | Nothing to install: it runs in your browser | MuseScore and FFmpeg |
| Cost | First minute free with a small mark. Pro: no watermark, full length | Free |
From MuseScore to a video of your playing
Here is the whole way, start to finish. Most of it takes care of itself, so the choices are the fun part.
1. Export the score from MuseScore
Go to File, Export, and choose MusicXML. SheetVideo reads the exported file, so keep your .mscz as your working copy. Here is what each export gives you:
| Export | What comes across | Use it when |
|---|---|---|
| MusicXML | The notes, rests, key, bars and part names, just as you wrote them | Almost always. This is the best start |
| The printed page, read note by note | A PDF is what you have to hand | |
| MIDI | The notes and their timing | You want keys or falling notes and no sheet on screen |
2. Record yourself
A phone is enough. Video or sound alone both work. A few things make the rest easier:
- Play the repeats the way the score writes them, so the notes on screen match what you play
- Talking and tuning before you start are fine: you can trim them off without losing any quality
- Recorded one section only? Tell it which bars, and the video shows that part of the score
3. Drop both files in
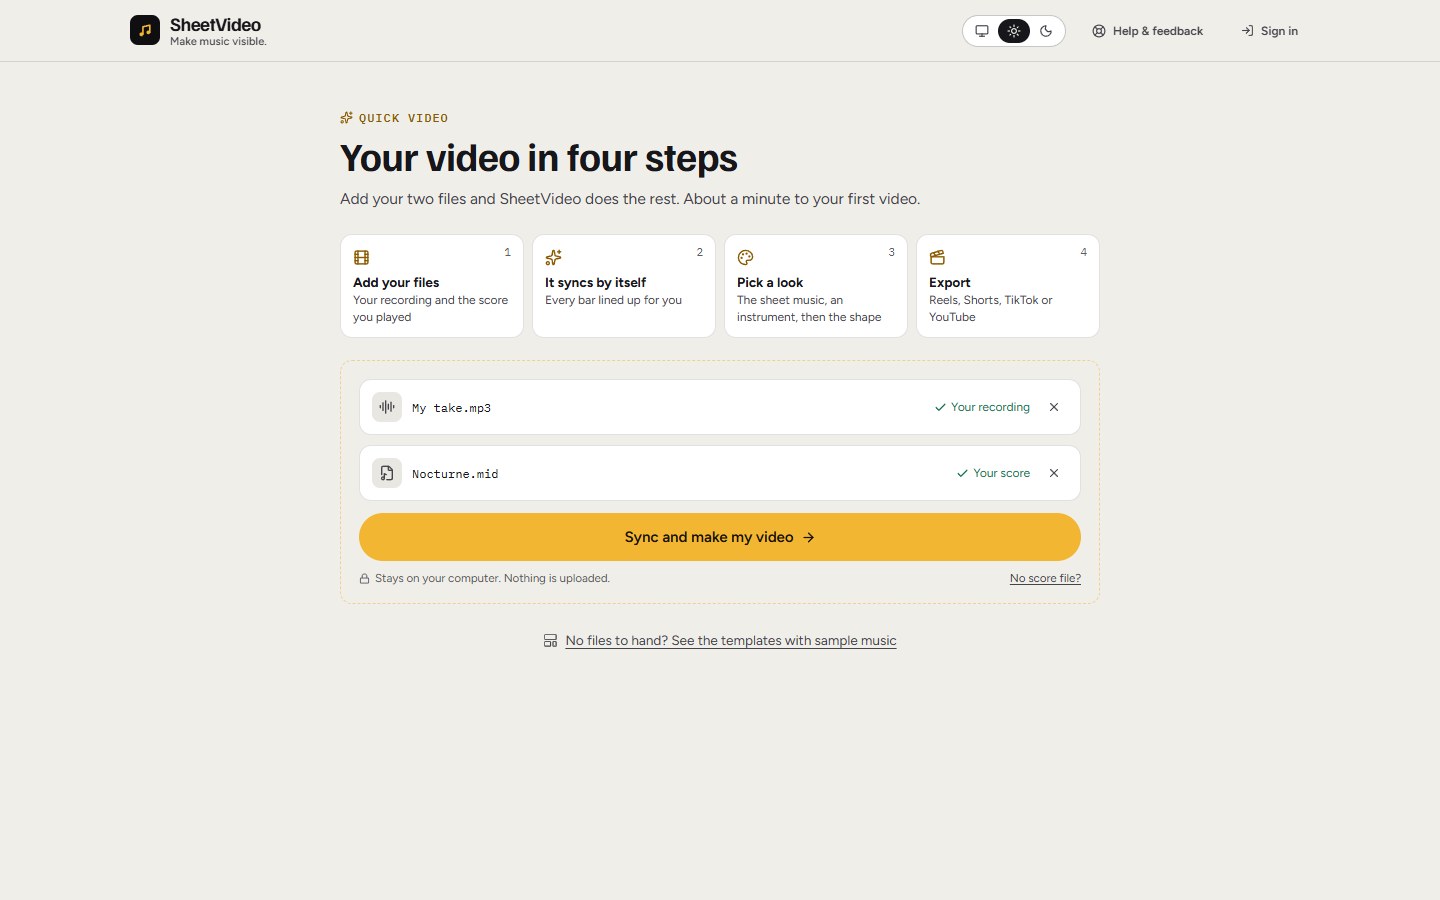
Add the recording and the score, then press the button. Every bar lines up with your playing by itself, including the slow passages and the held notes, and you can check any of it afterwards.
4. Pick a look
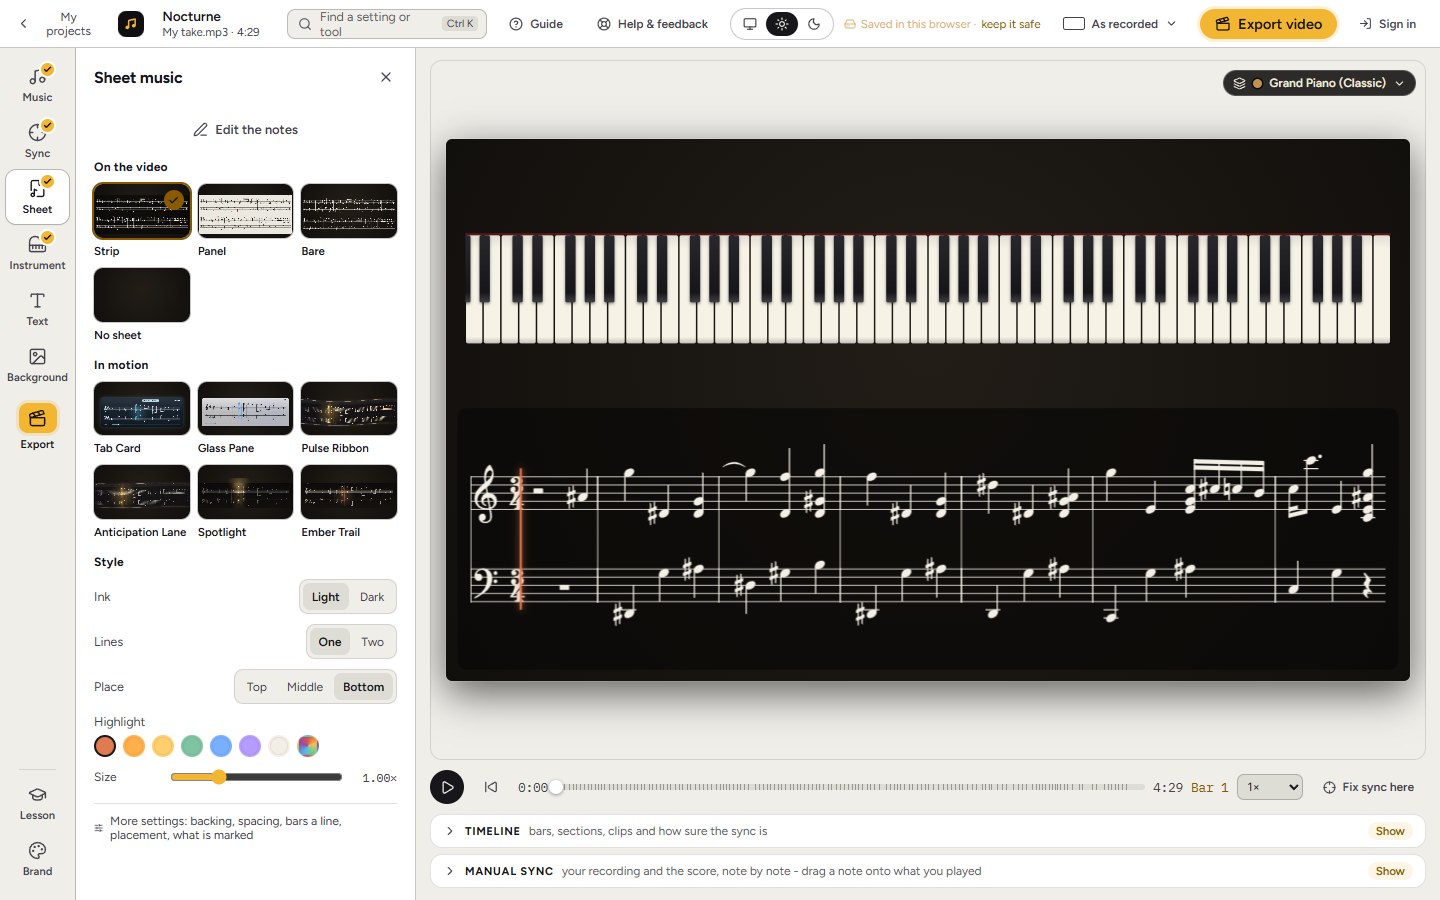
Choose how the sheet music sits on the video: a strip of the score, a clean panel, or a look where the bar being played draws the eye. Then add an instrument if you like. Viewers who play will watch it to see how the piece goes.
5. Fix anything you want to change
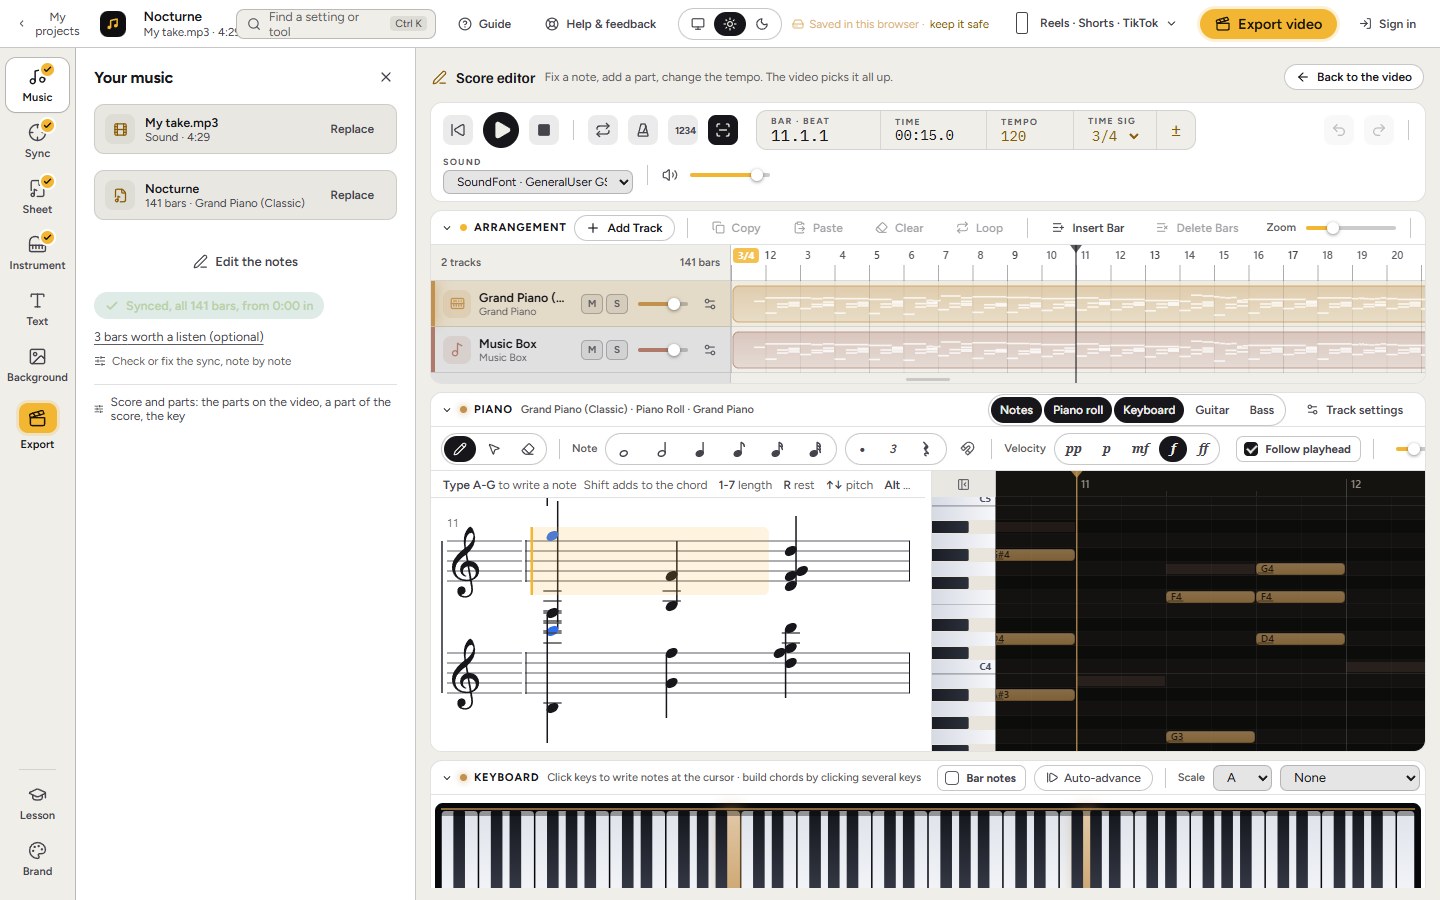
If you played something differently from the page, open Edit the notes. It works the way Guitar Pro and MuseScore users expect: arrow keys to move, letters to write, numbers for the length. You do not have to go back to MuseScore and export again.
6. Choose the shape and export
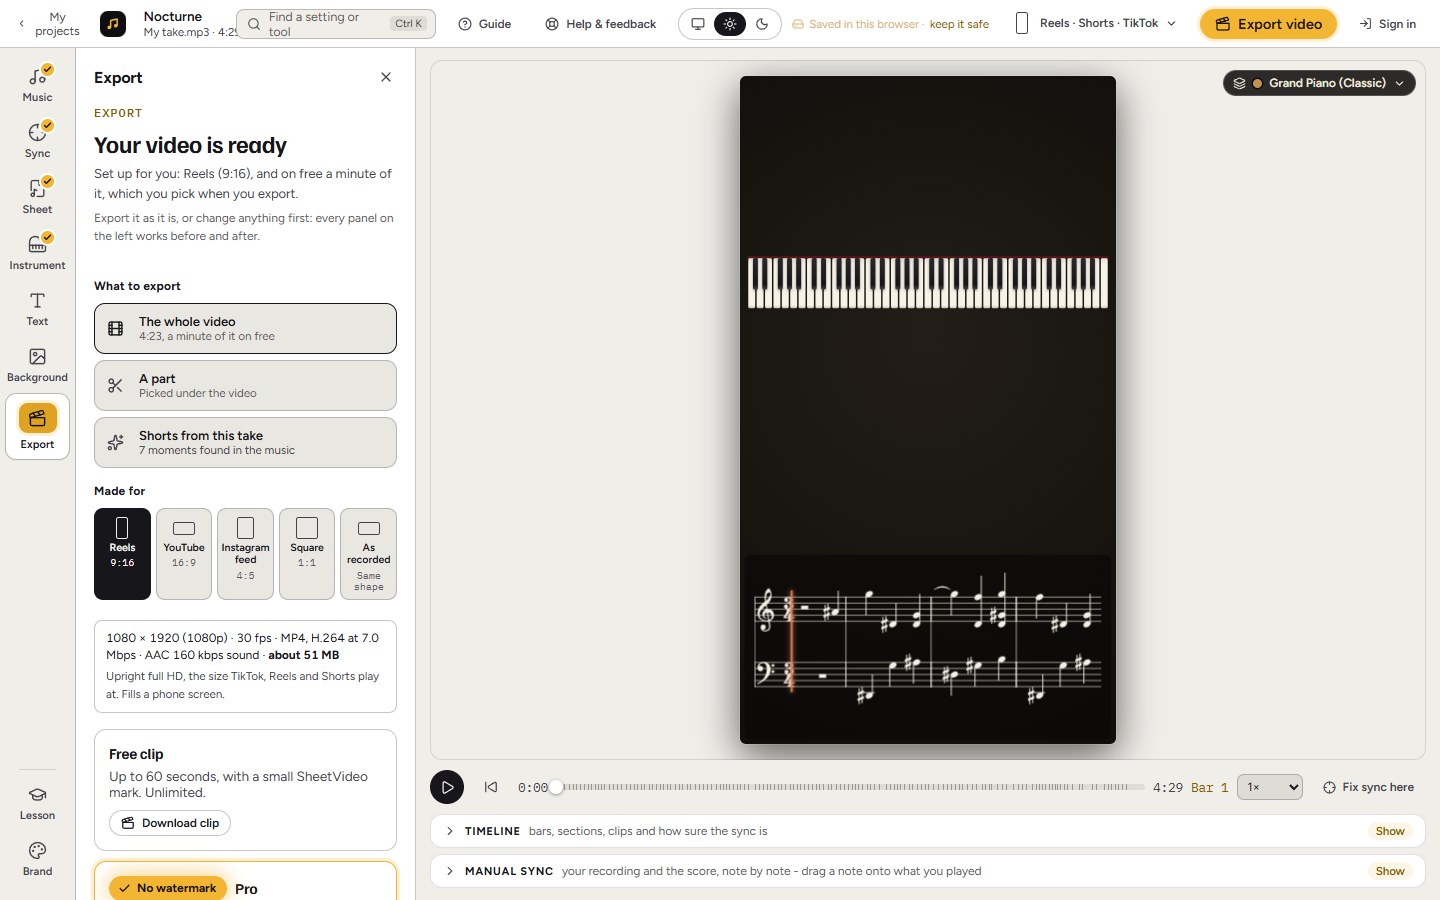
One take can be a YouTube video and a Reel from the same project, and you can export a part as well as the whole. It also finds moments in the music that work as Shorts. The first minute is free with a small mark. Pro means no watermark and the whole take.
Getting the score ready in MuseScore
A minute in MuseScore before you export saves you editing later:
- Name your parts. Their names come across as you wrote them, so the list of parts reads the way you expect
- Check that repeats and endings match how you played the piece
- Writing for several instruments? Export the full score. You choose which parts appear on the video afterwards
- Check the key and time signatures, since the score on screen follows them
When MuseScore’s own export is the right one
- A quick video of a new piece, for a friend, a teacher or a collaborator
- Music where the program’s playback sounds good, or where you have set up good sounds
Why a real recording needs more than the export
An export like this uses the program’s own playback. A person playing does not follow the tempo in the file. They breathe, push and hold back, and that is the reason to record them. So if you lay MuseScore’s video over a real performance, the two come apart.
The other way round this is to write tempo changes into the score until playback follows the performance closely, then swap the sound in a video editor. This can be accurate if you are patient, and it is slow for anything with rubato.
Before MuseScore could do this
If you read older threads, you will see people recommending screen capture and video editors, because that was all there was. A 2023 thread on VI-Control asks this same question, and a Dorico thread offers that advice to this day. You can still do it that way, but you no longer have to.