How to do it, click by click
Every picture below is the real SheetVideo editor, with what to click ringed and numbered. The example is a recording of Chopin’s Nocturne in E-flat, Op. 9 No. 2.
1Check the sync, if you want to
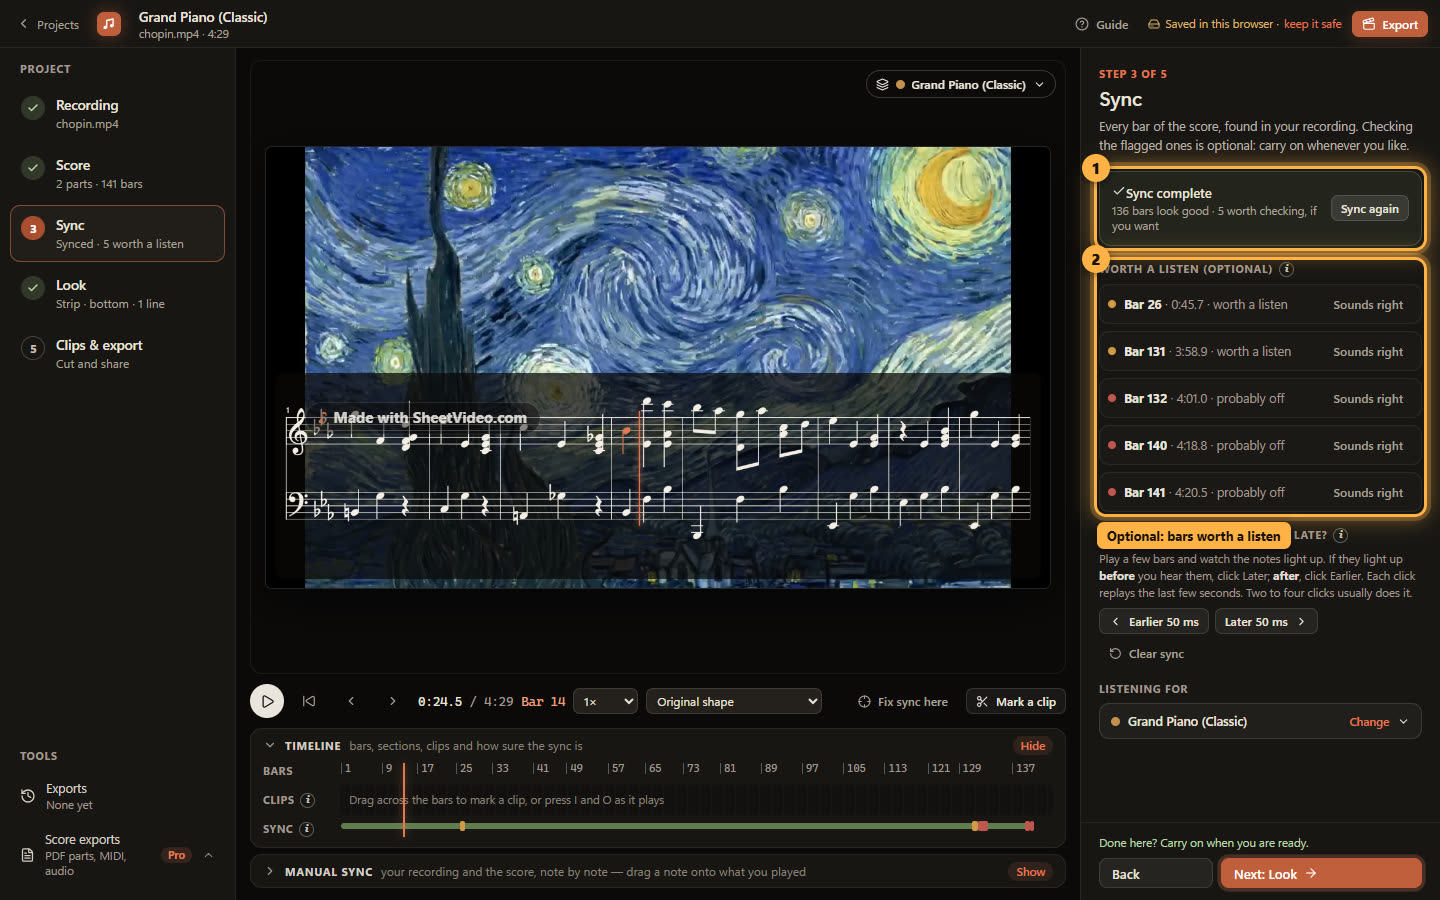
Click Stay here as the sync finishes, or come back to the Sync step any time. The panel says how it went and lists the bars worth a listen with their times. Checking them is optional; they are marked amber and red on the timeline too.
Click one to jump there and hear it. If it sounds right, click Sounds right and it drops off the list. In the Nocturne they sit in the closing bars, where the cadenza is played very freely.
2Everything a touch early or late?
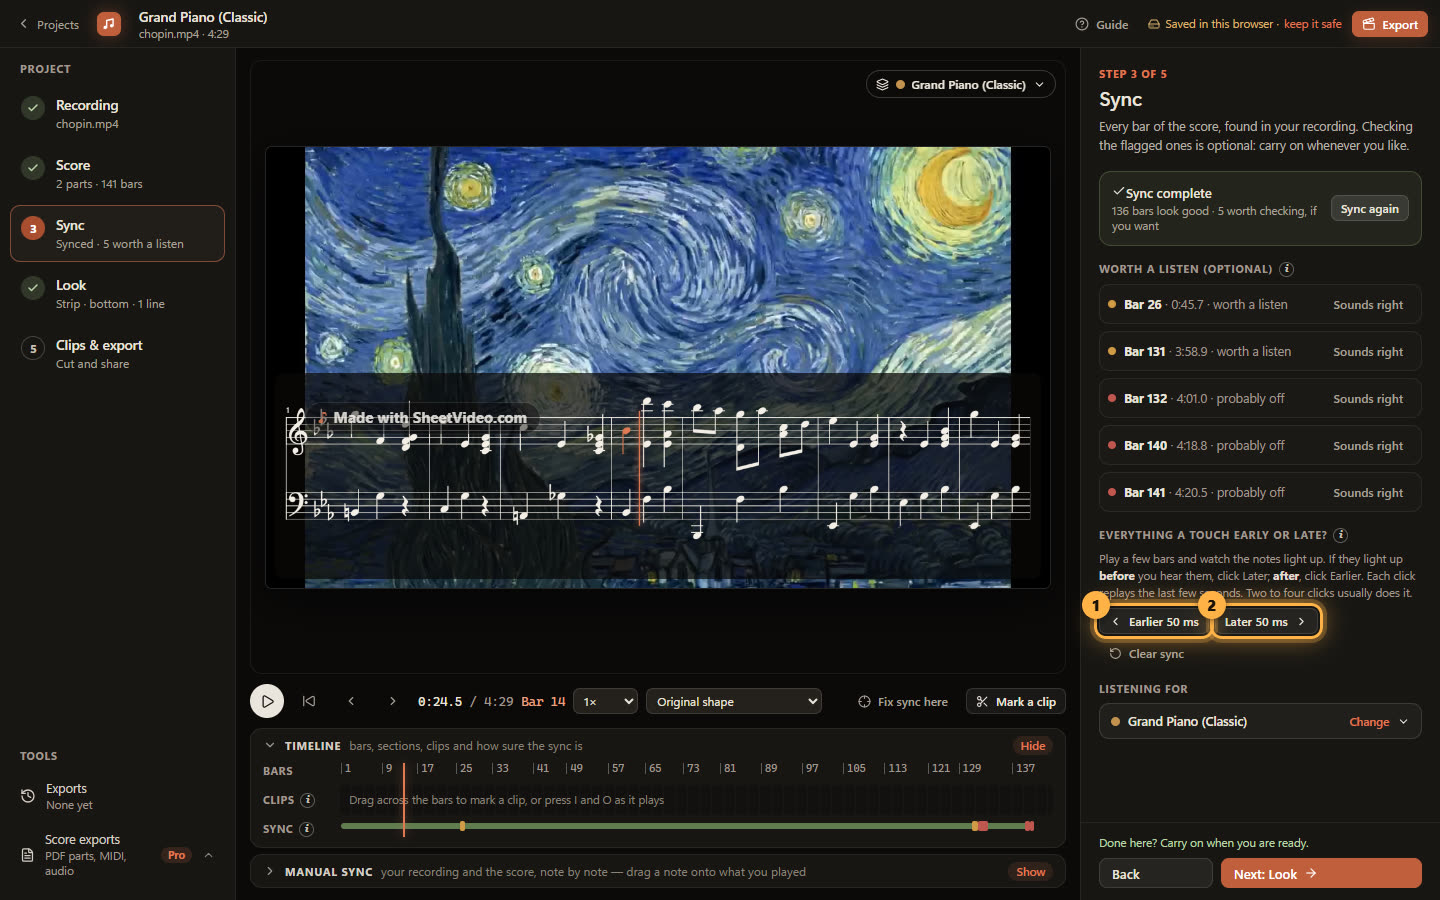
A recording’s sound can sit a little off its picture, so the whole score can feel early or late even when every bar was found. Play a few bars and watch the notes light up. Lighting up before you hear them: click Later 50 ms. After: Earlier. Each click replays the last few seconds; two or three usually settle it.
3Fix one bar by hand
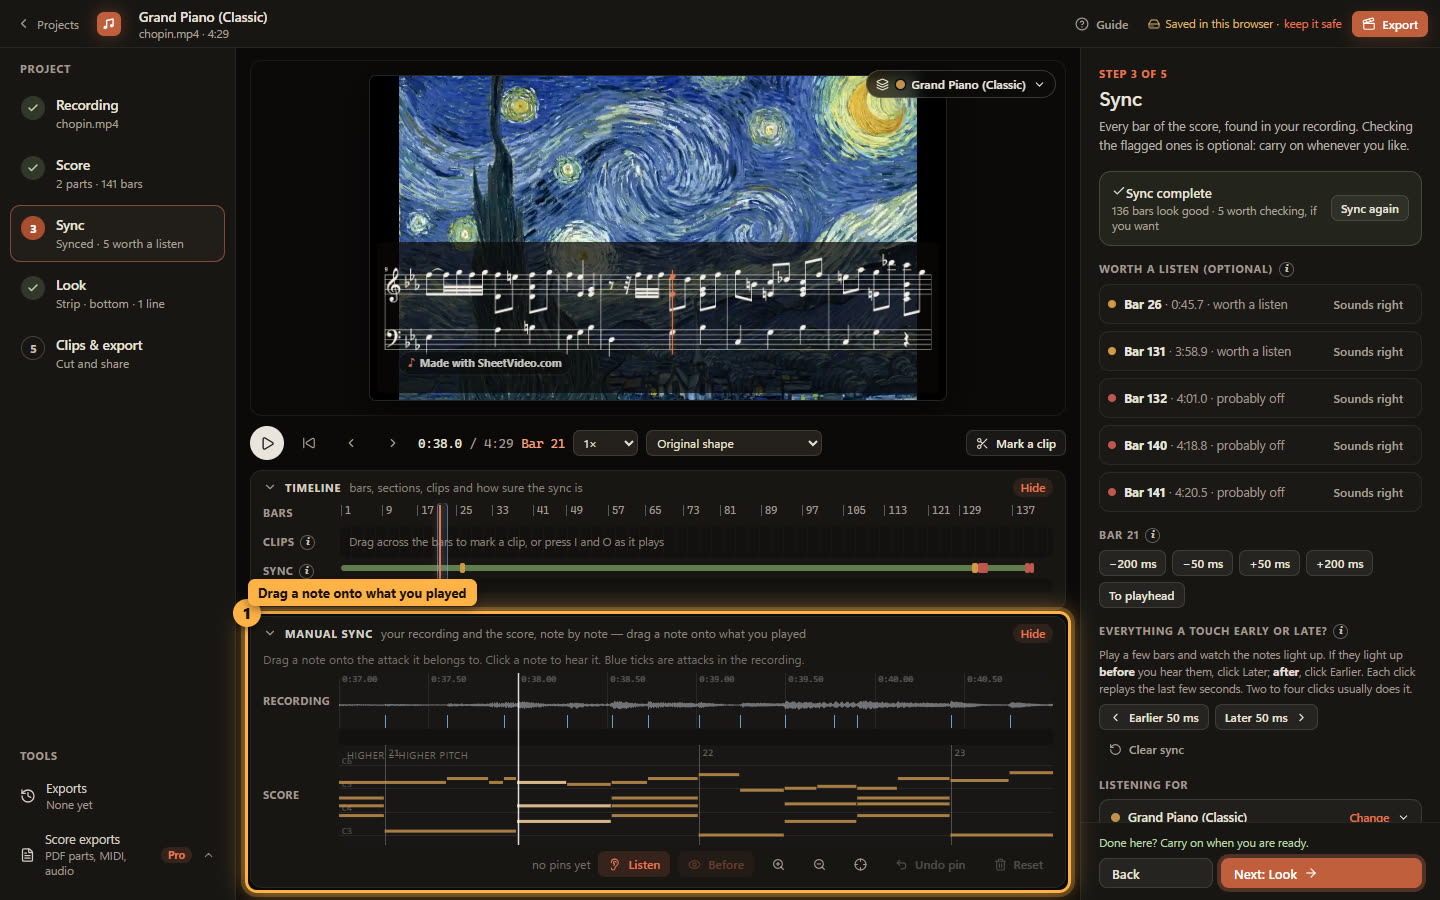
Stop on a bar that is off and click Fix sync here, under the video. Manual sync opens: the recording’s attacks across the top, the score’s notes underneath.
Drag a note onto the attack it belongs to and only that stretch moves; the bars either side stay put. Your fixes are kept if you ever sync again.
4Starting from your last video
Made one before? When a new project’s first sync is done, SheetVideo offers the look of the last video you exported — the view, the instrument, what goes behind the score and the shape — fitted to the new score (a keyboard becomes a fretboard for a guitar part). Yes applies it and takes you to the export; No carries on to the Look step.
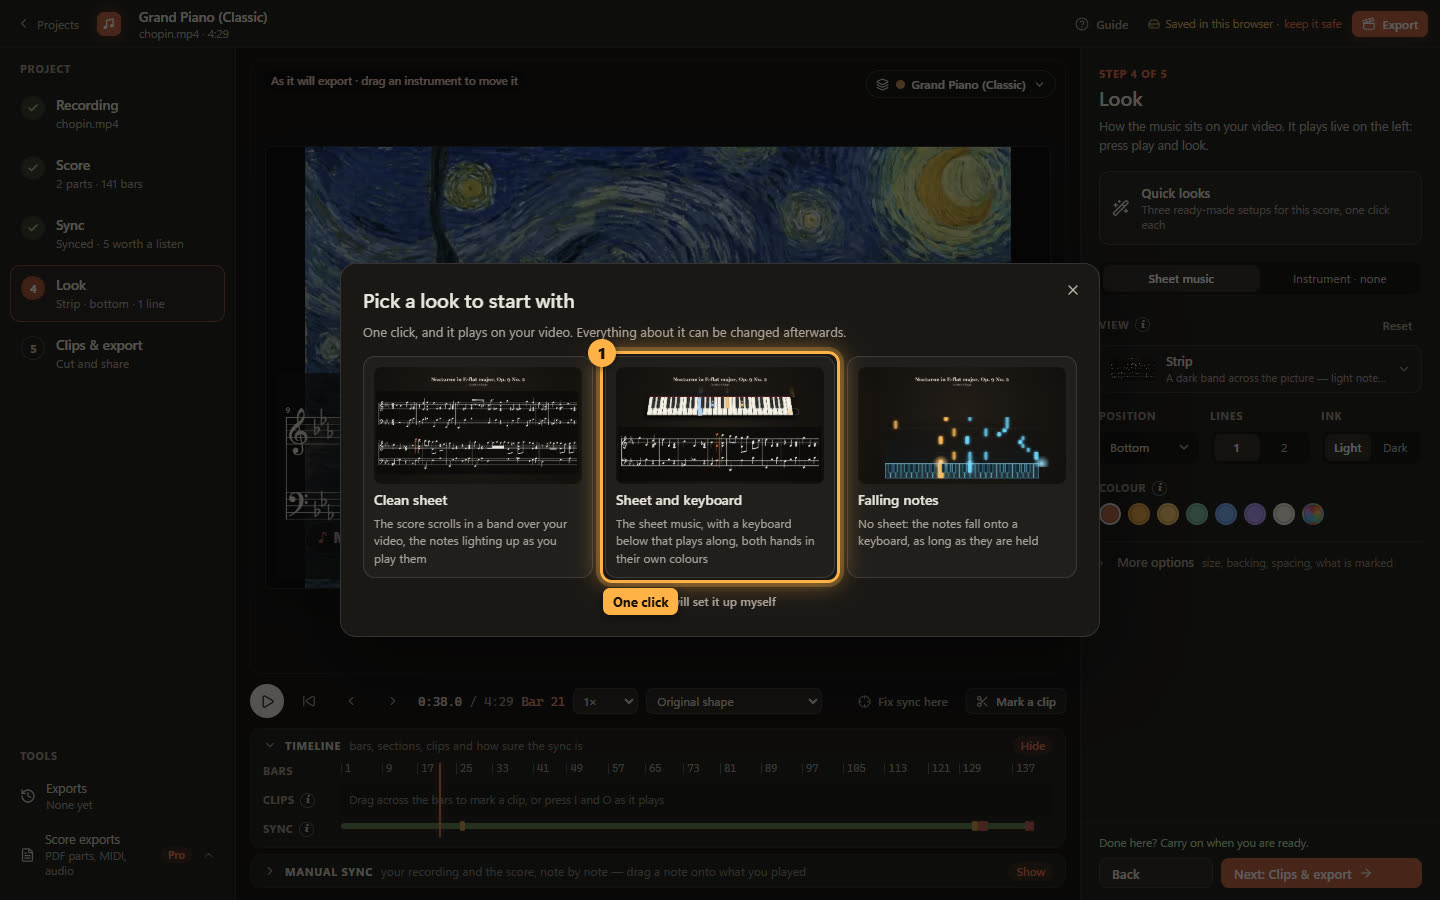
5Pick one of three looks
The Look step opens with three ready-made looks for the instrument you played. For piano: Clean sheet (the score in a band over the video), Sheet and keyboard (the score, and a grand piano that plays along), and Falling notes (no sheet, the notes falling onto the keys).
Click one and it is on your video. Here it is Sheet and keyboard. All fourteen views and the other instruments are one click away afterwards.
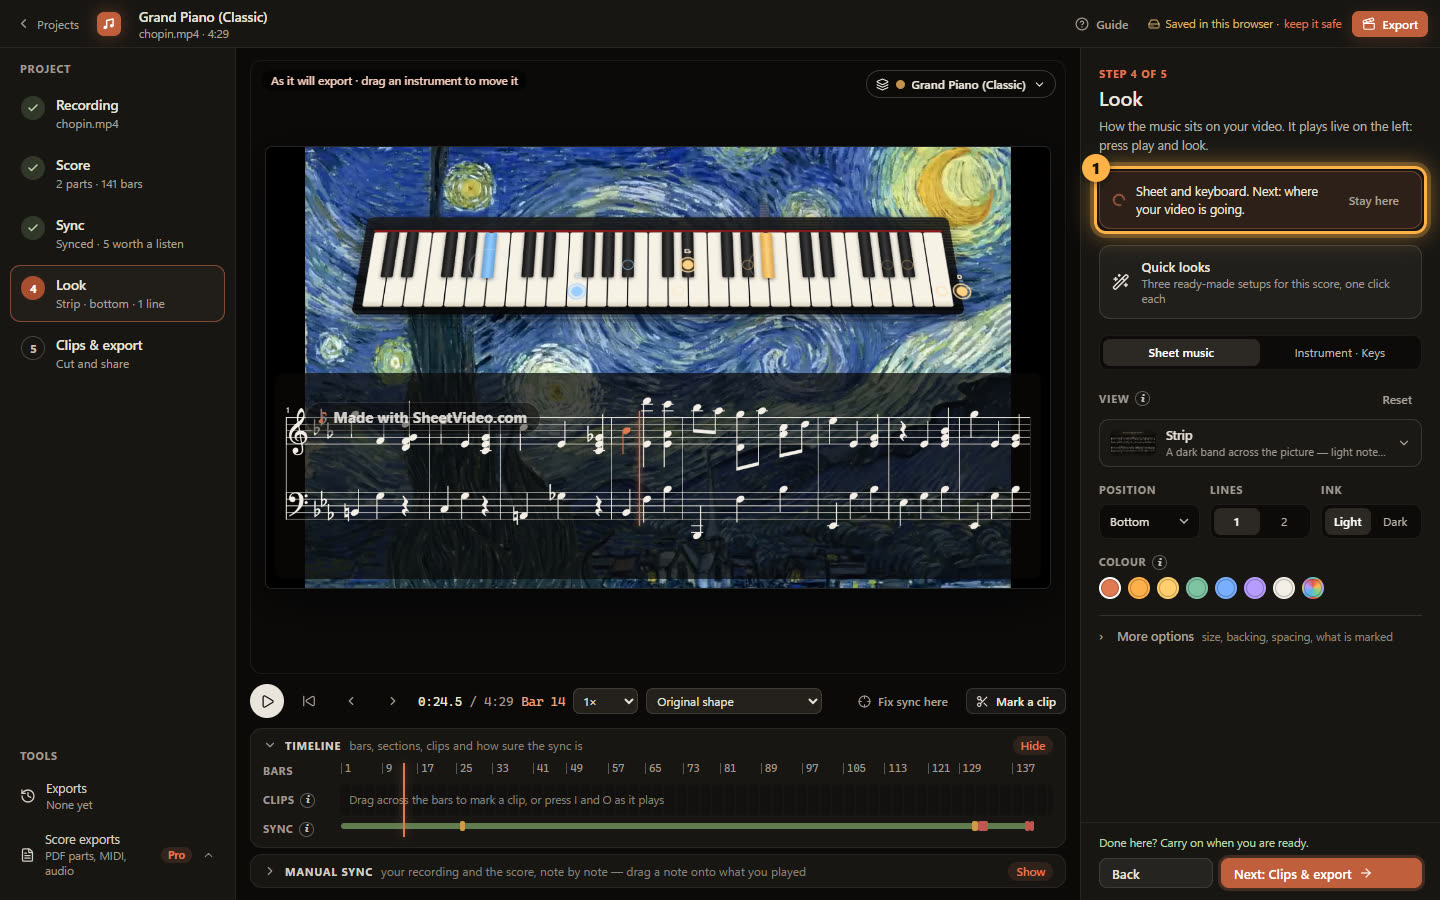
6The look is on
The picture on the left is the export itself, now with the Strip along the foot and a concert grand above it, both hands in their own colours. A moment later the project moves on to Clips & export.
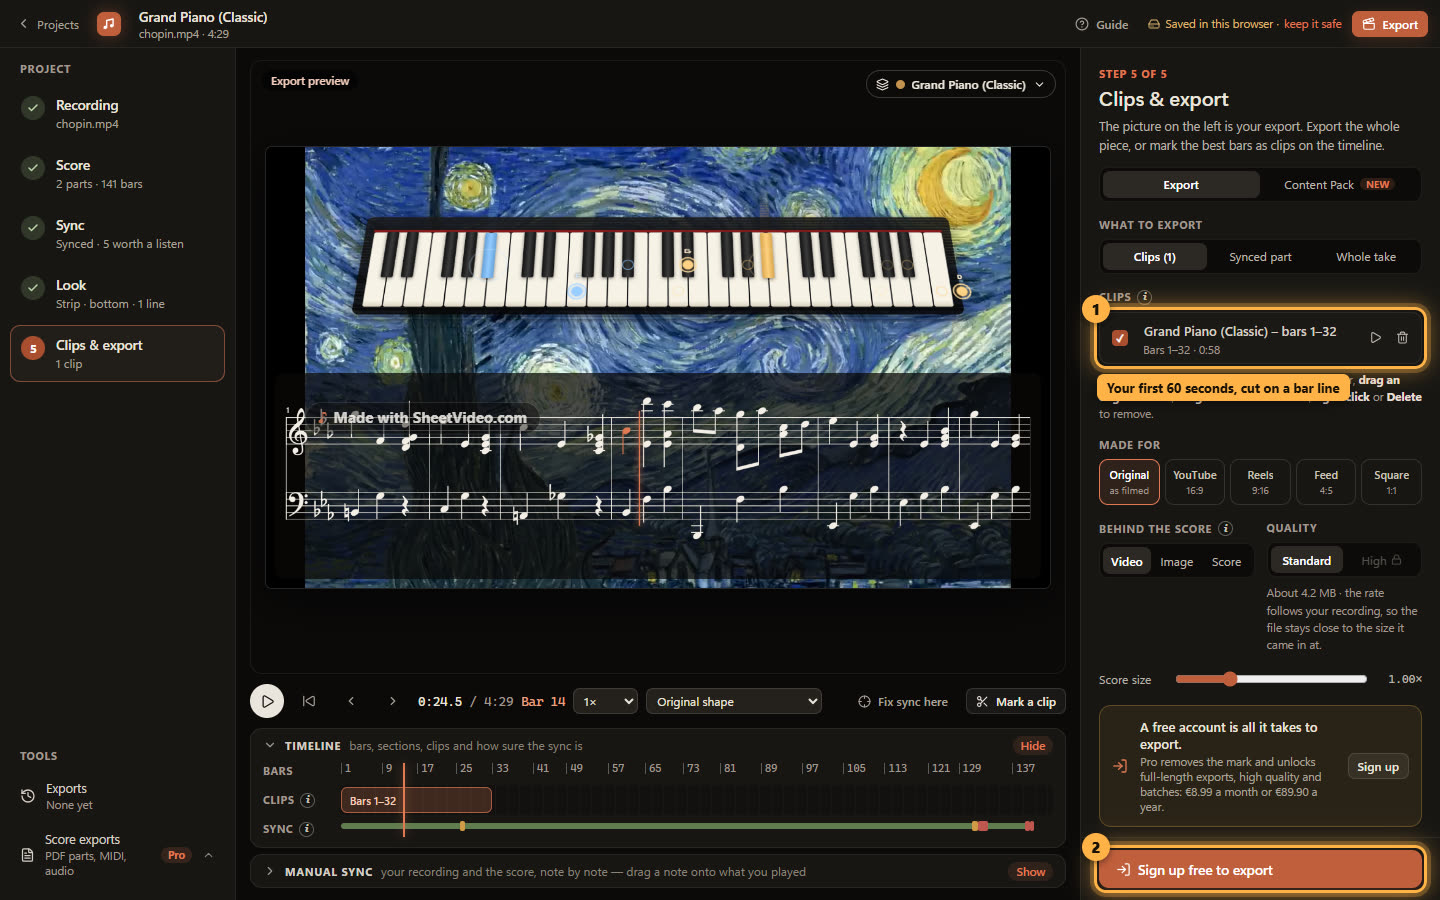
7What goes out
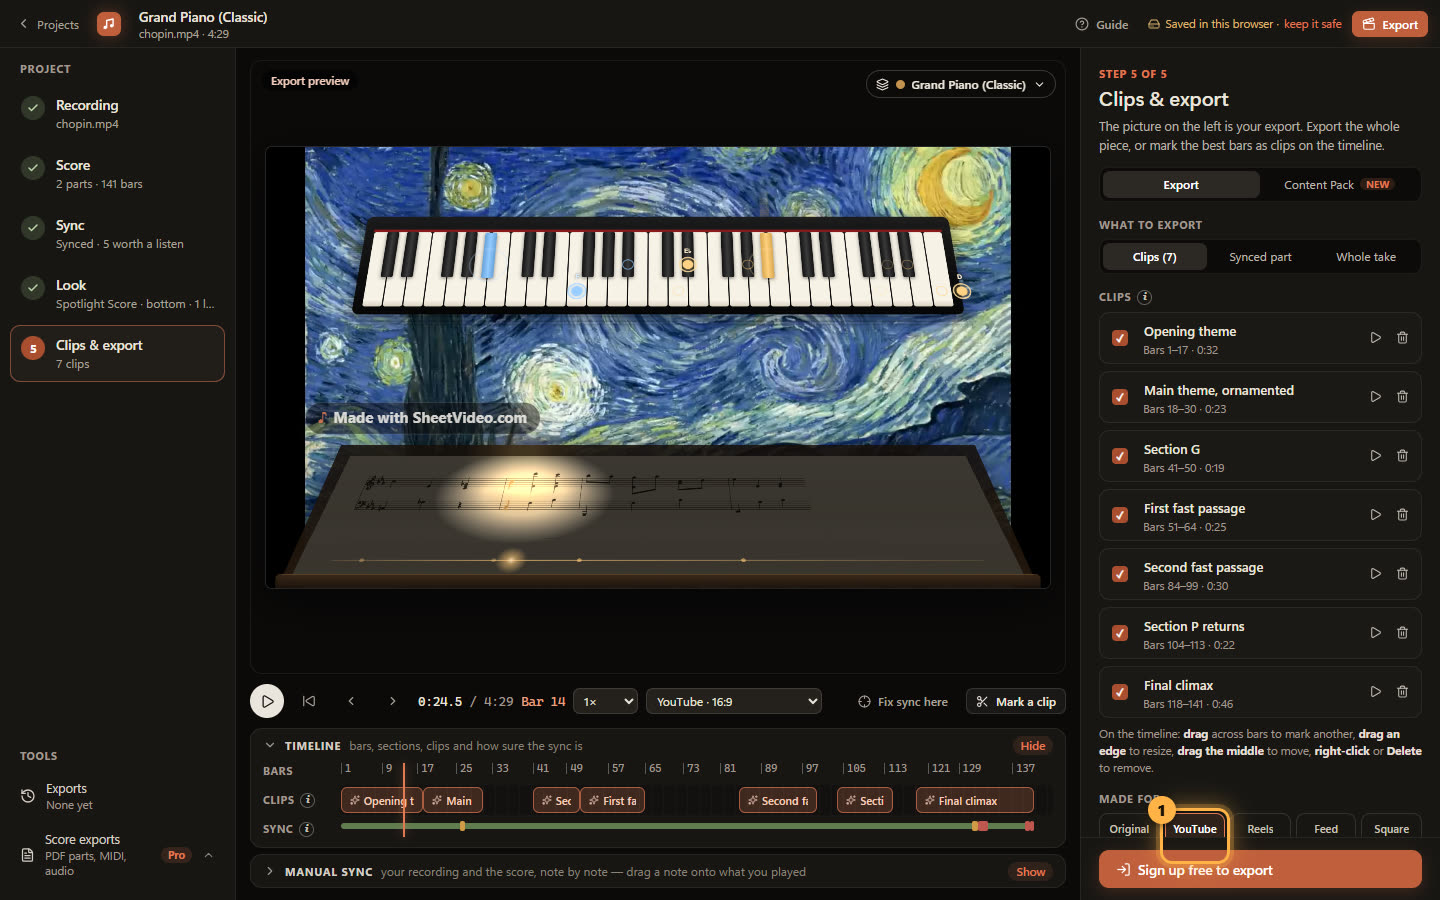
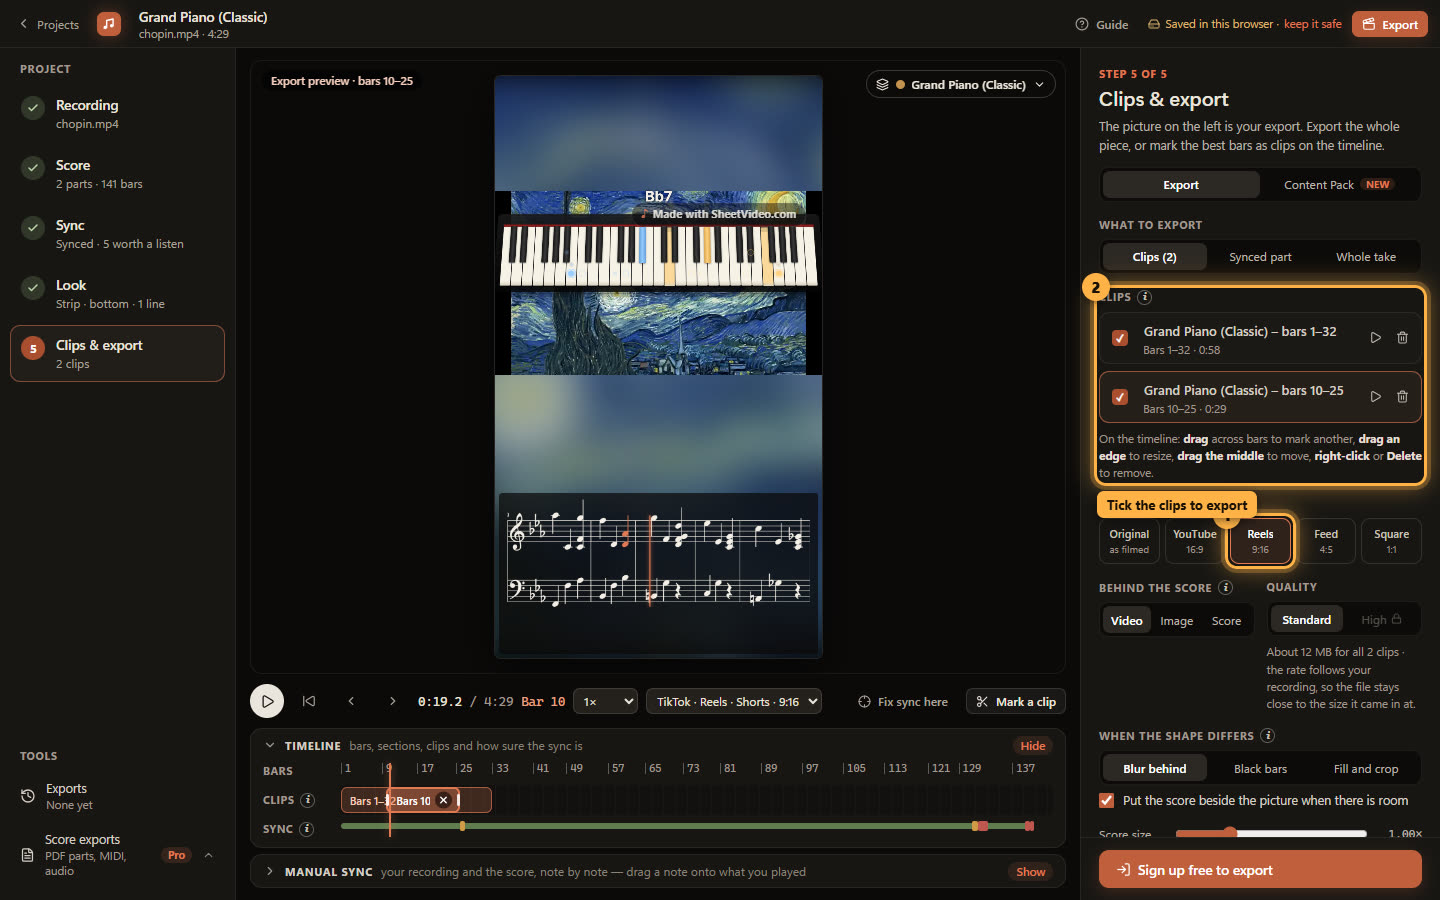
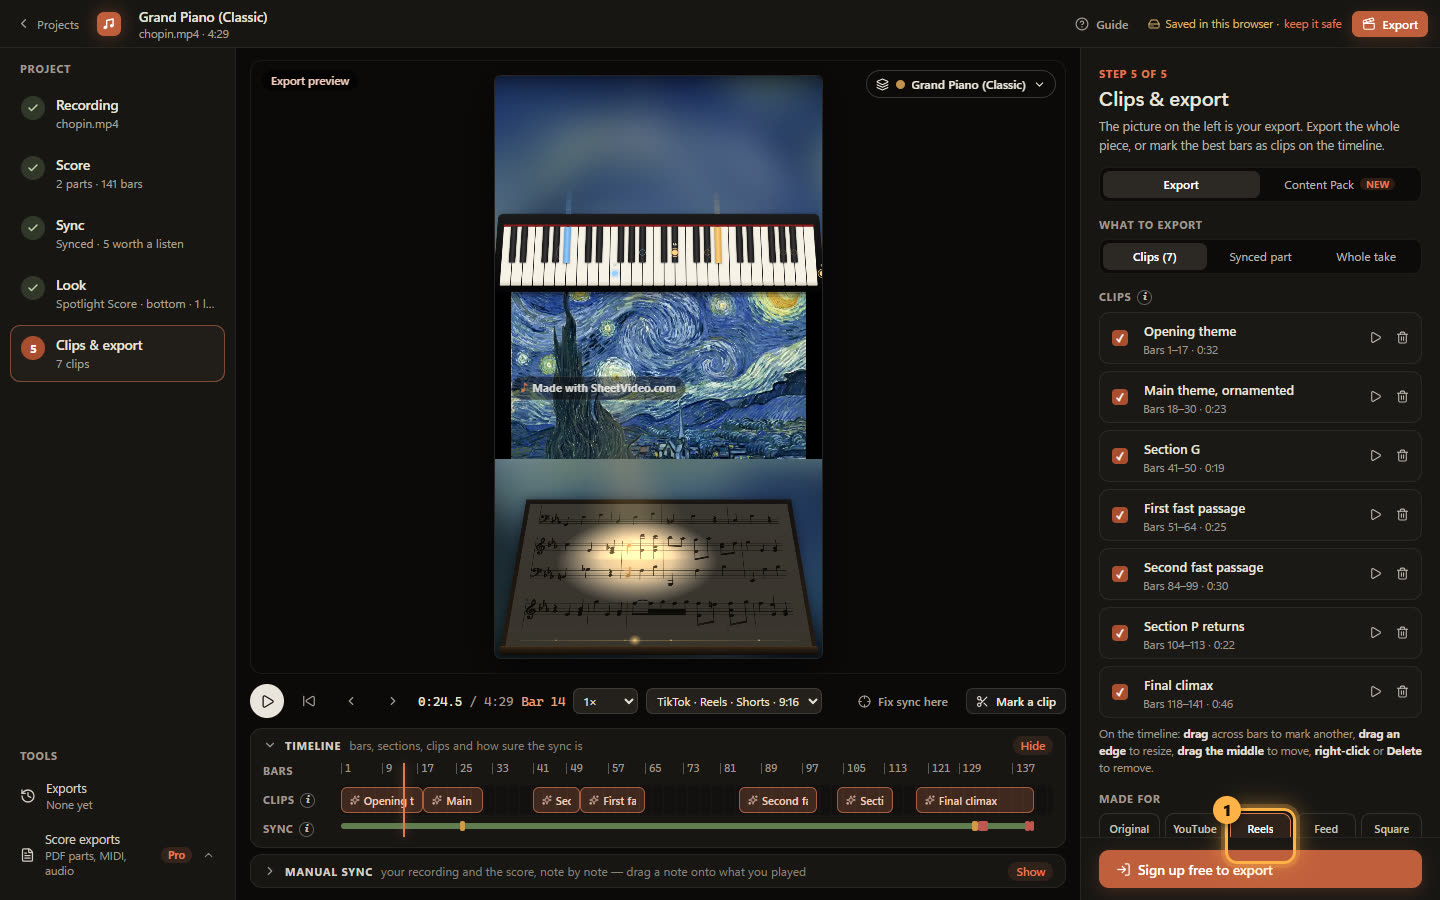
Clips & export lists what will be exported. On free, the first 60 seconds that end on a bar line are already marked as a clip. What to export switches between your clips, the synced part (first note to last) and the whole take; Made for sets the shape.
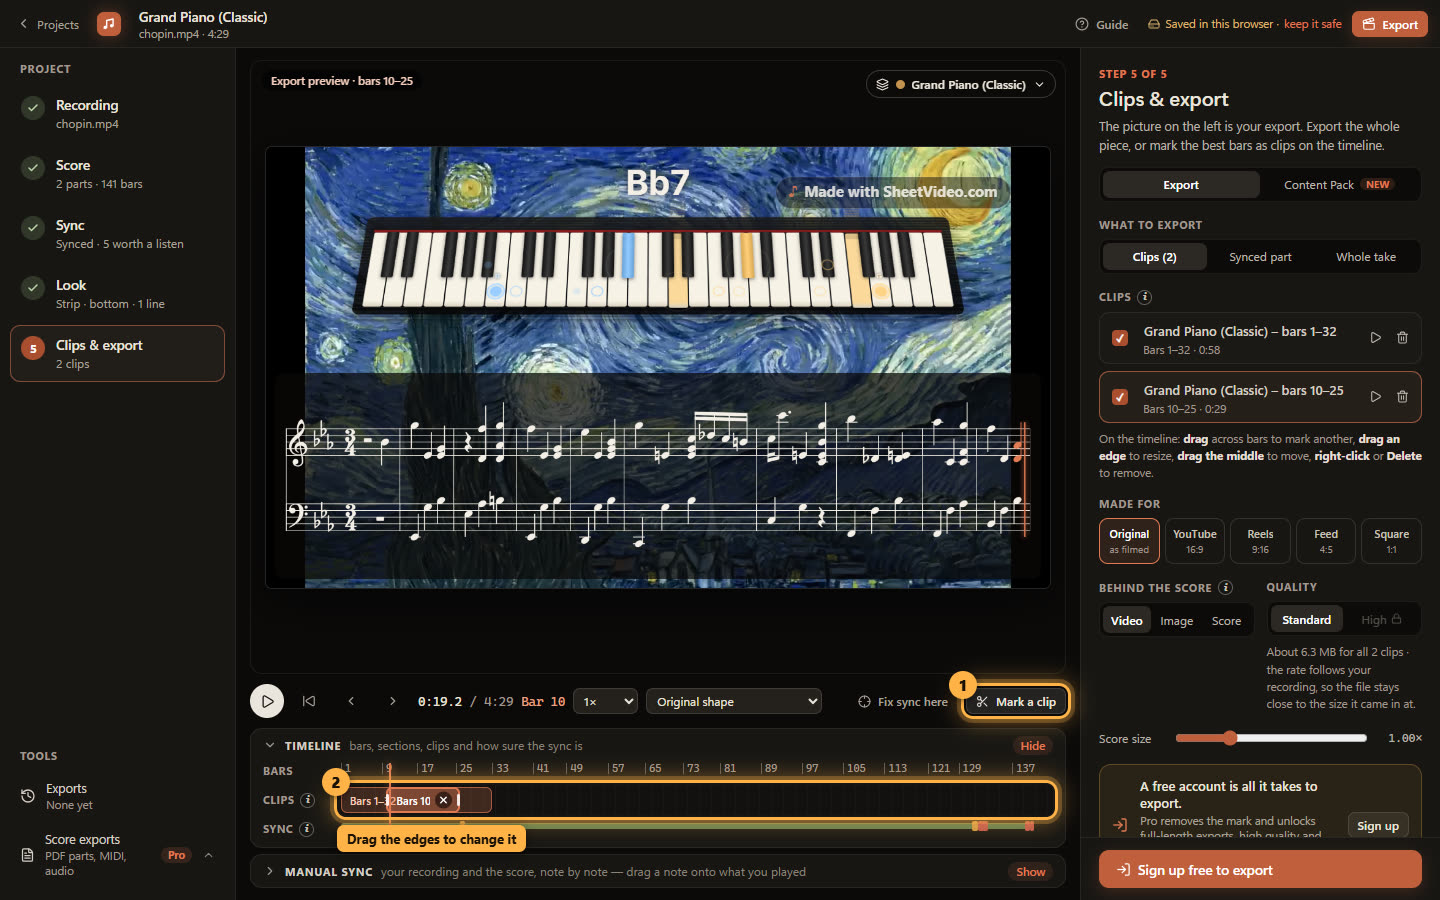
8Mark the part worth posting
For a Short or a Reel you want the best thirty seconds, not the whole take. Stop the video at the bar where the clip should start and click Mark a clip under the video.
A clip of about thirty seconds appears on the timeline, starting on that bar and ending on one. Drag its edges to change it, or drag across the bars on the timeline to mark another.
9Upright for Shorts, Reels and TikTok
Click Reels under Made for. A landscape video is never stretched: it sits whole on a blurred copy of itself, on black, or fills the frame with a centre crop — your pick under When the shape differs. The score is laid out again for the narrow frame.
Tick the clips to export. Several go out together in one zip, each file named after its clip.
10Or 16:9 for YouTube
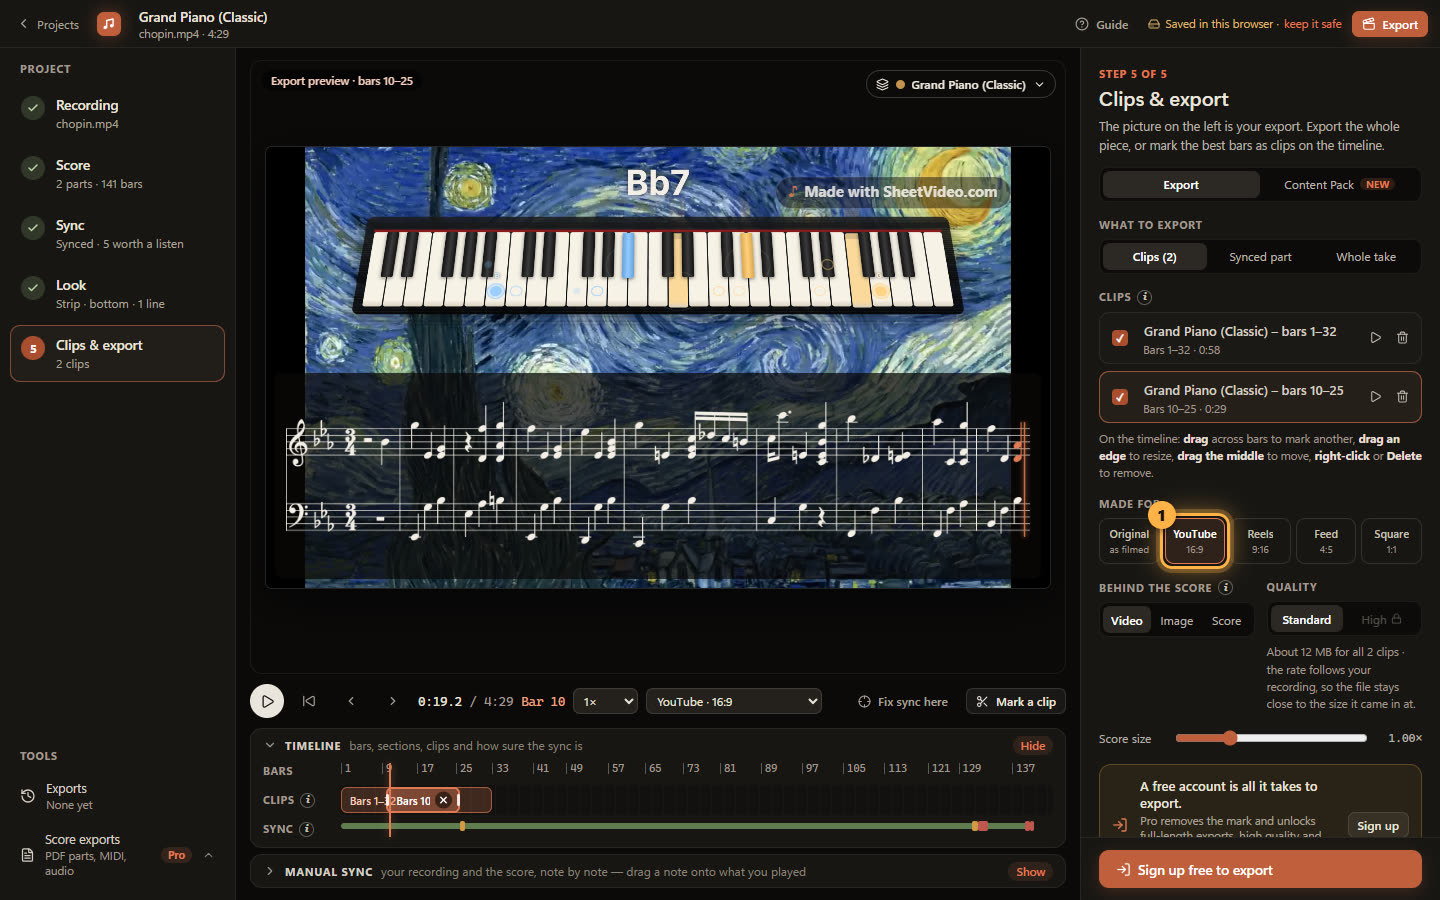
Click YouTube for the full-width version. Export the synced part for a performance video — it leaves out anything before the first note and after the last. Same project, same sync: export as many shapes as you like.
11Or let SheetVideo find the clips
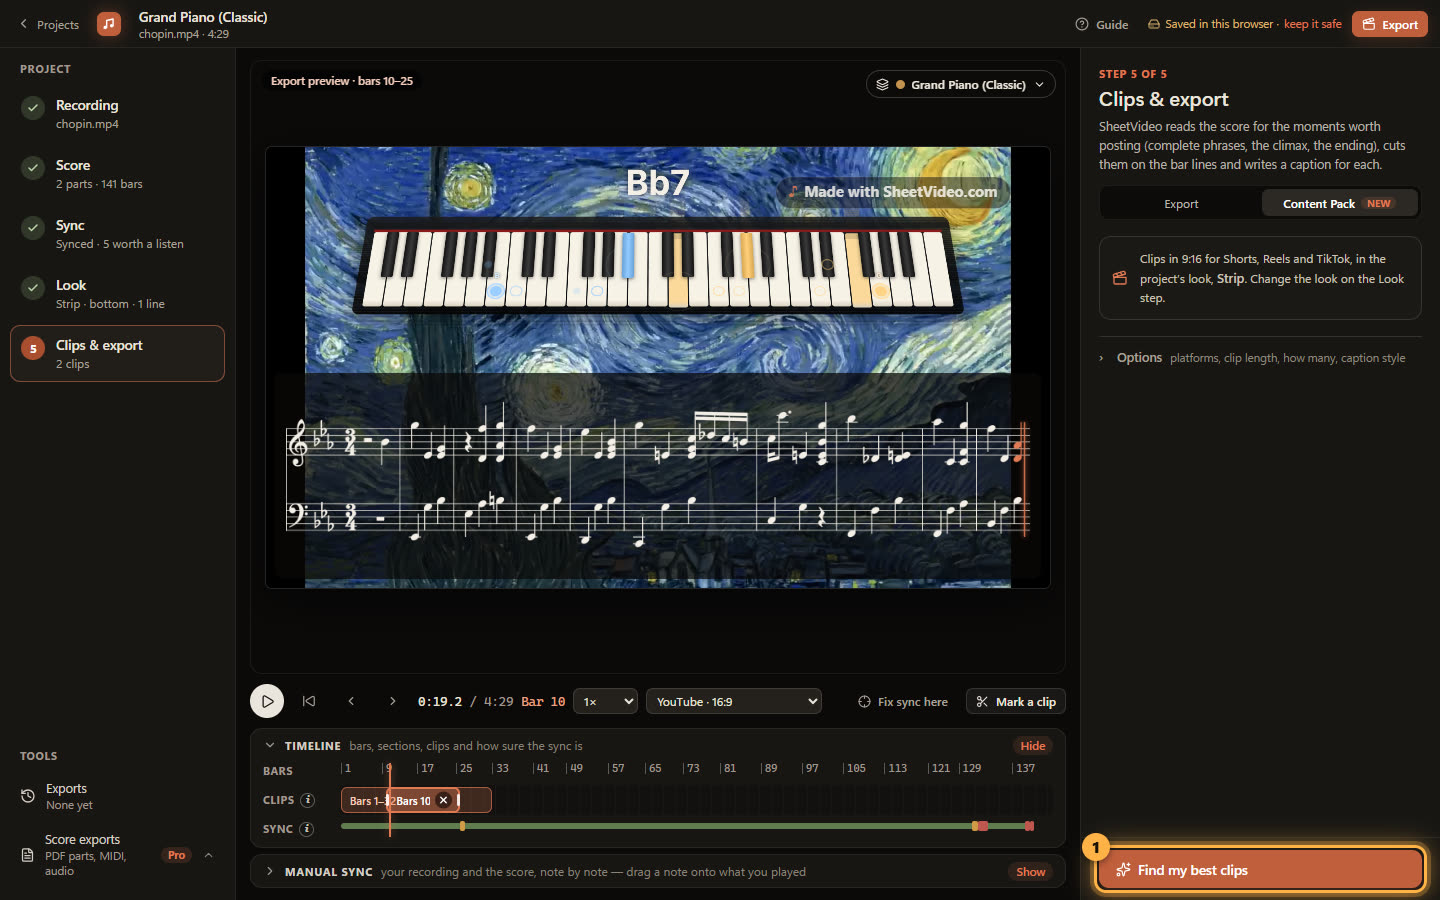
The Content Pack tab reads the score for the moments worth posting — complete phrases, the main theme, the climax, the ending — and cuts them on the bar lines, with a caption for each platform. Click Find my best clips; Options sets the length and how many.
12Keep the clips you like
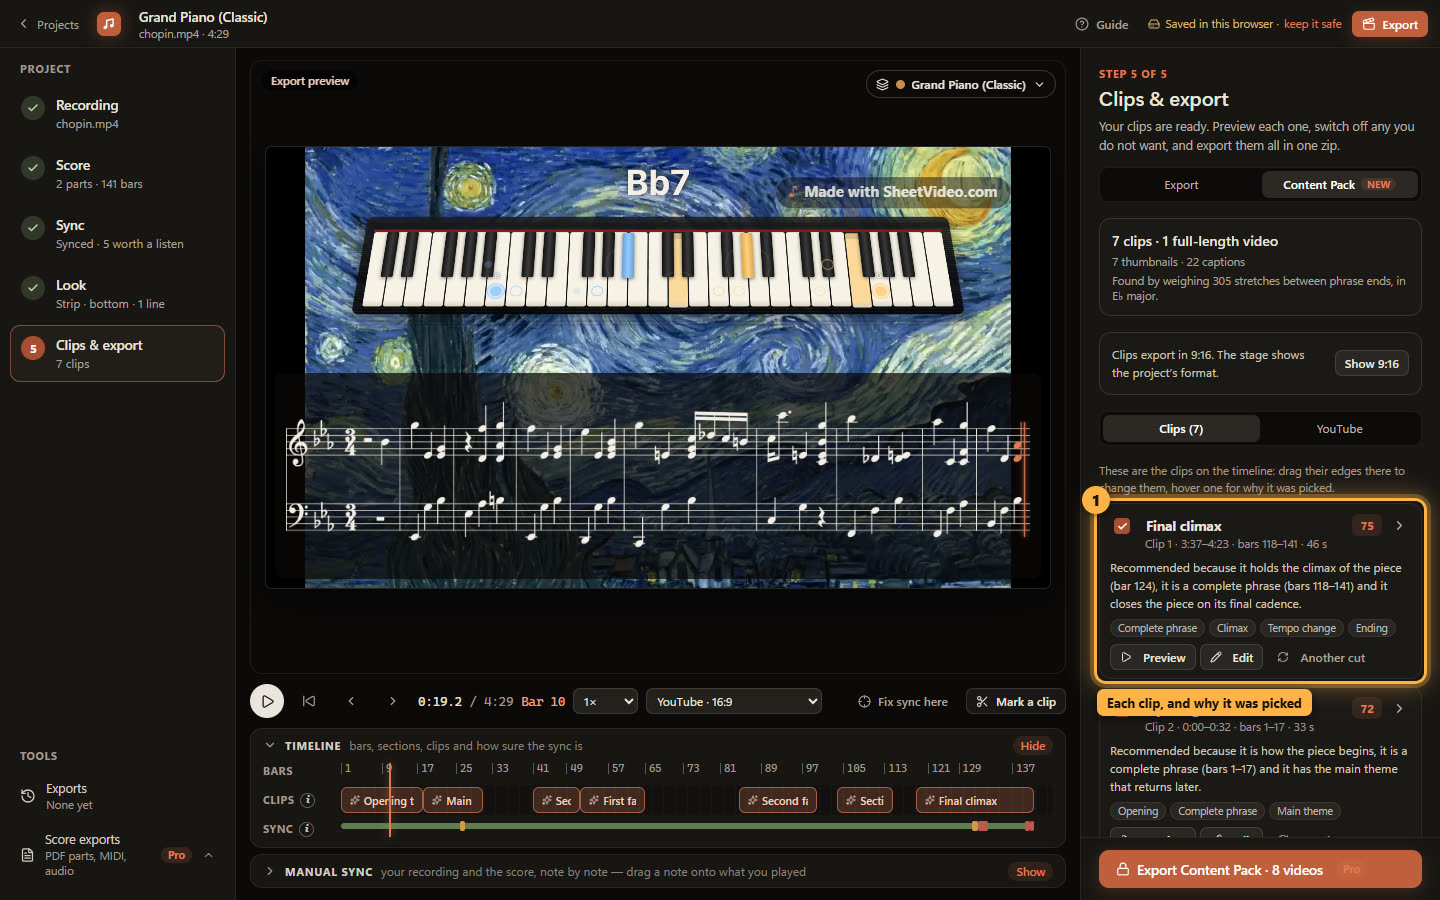
Each clip says why it was picked. Preview it, switch it off, or drag its edges on the timeline like any clip. Exporting the pack gives one zip: the videos, a cover for each, and the captions in metadata.csv. Finding and previewing clips is free; exporting the whole pack at once comes with Pro.
13Change the look any time
Back on the Look step, Quick looks opens the three ready-made looks again. Under it are two tabs: Sheet music (how the notes are drawn) and Instrument (what plays along). Any view goes with any instrument, or with none.
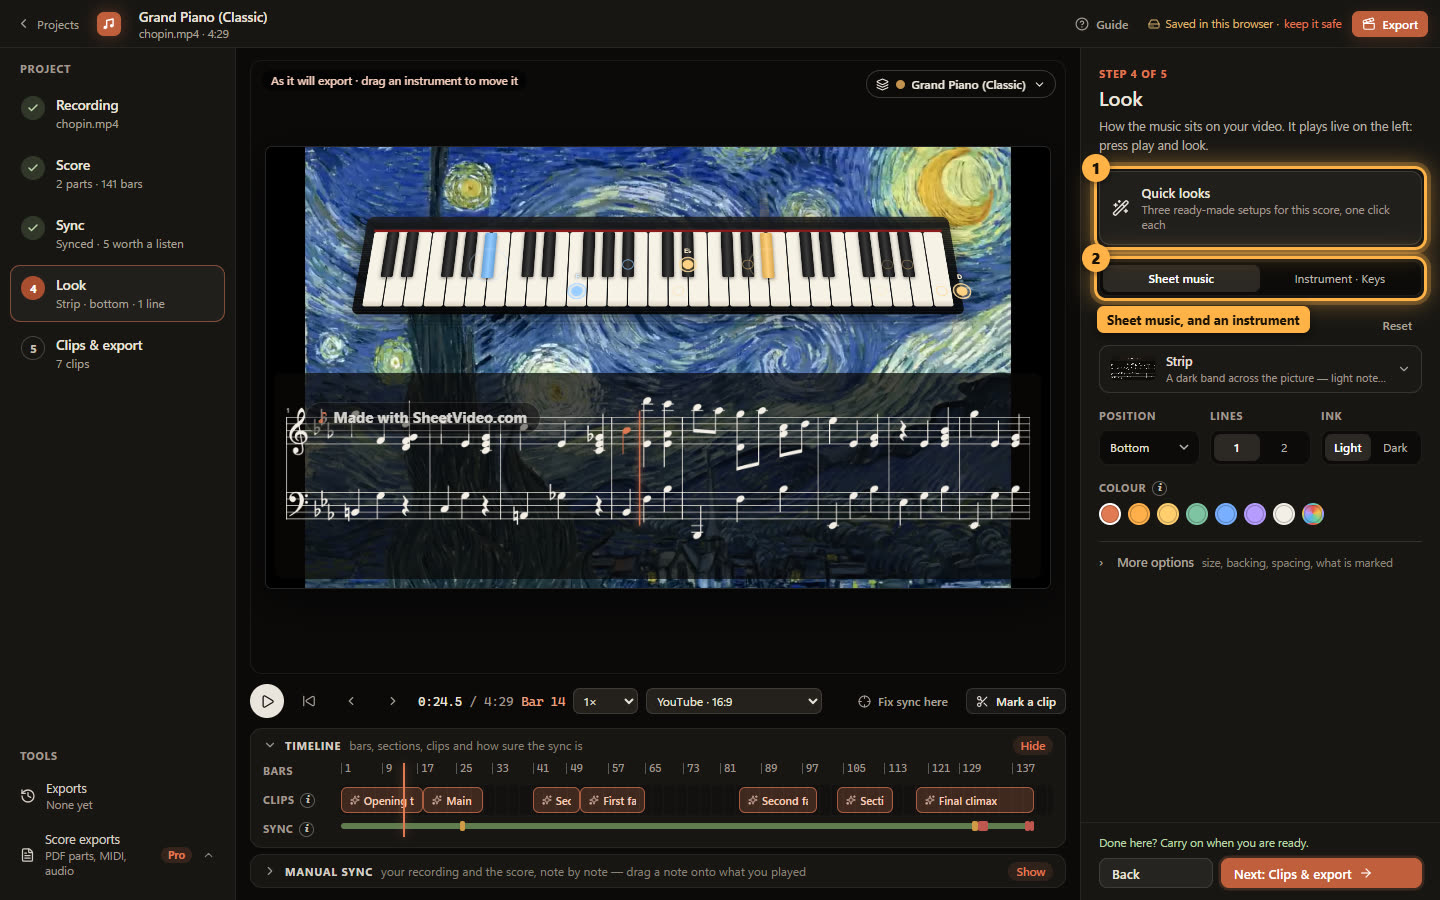
14Try another view
Click the view’s name to see all fourteen as thumbnails: the classic ones that sit still over the picture first, then the ones that move with the music. Pick one and the video shows it straight away, with the same sync.
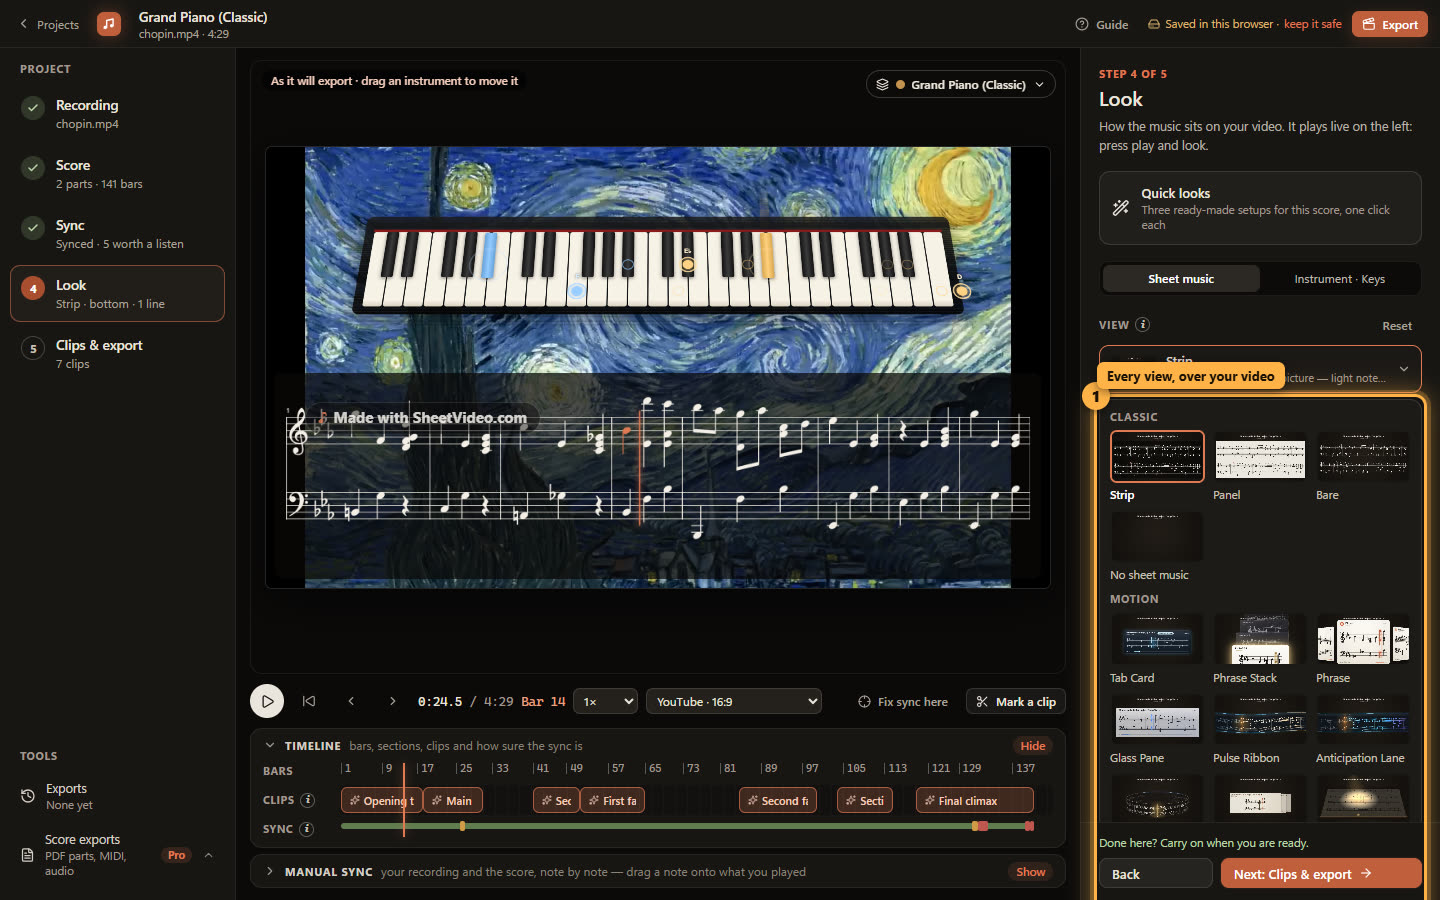
15Spotlight Score
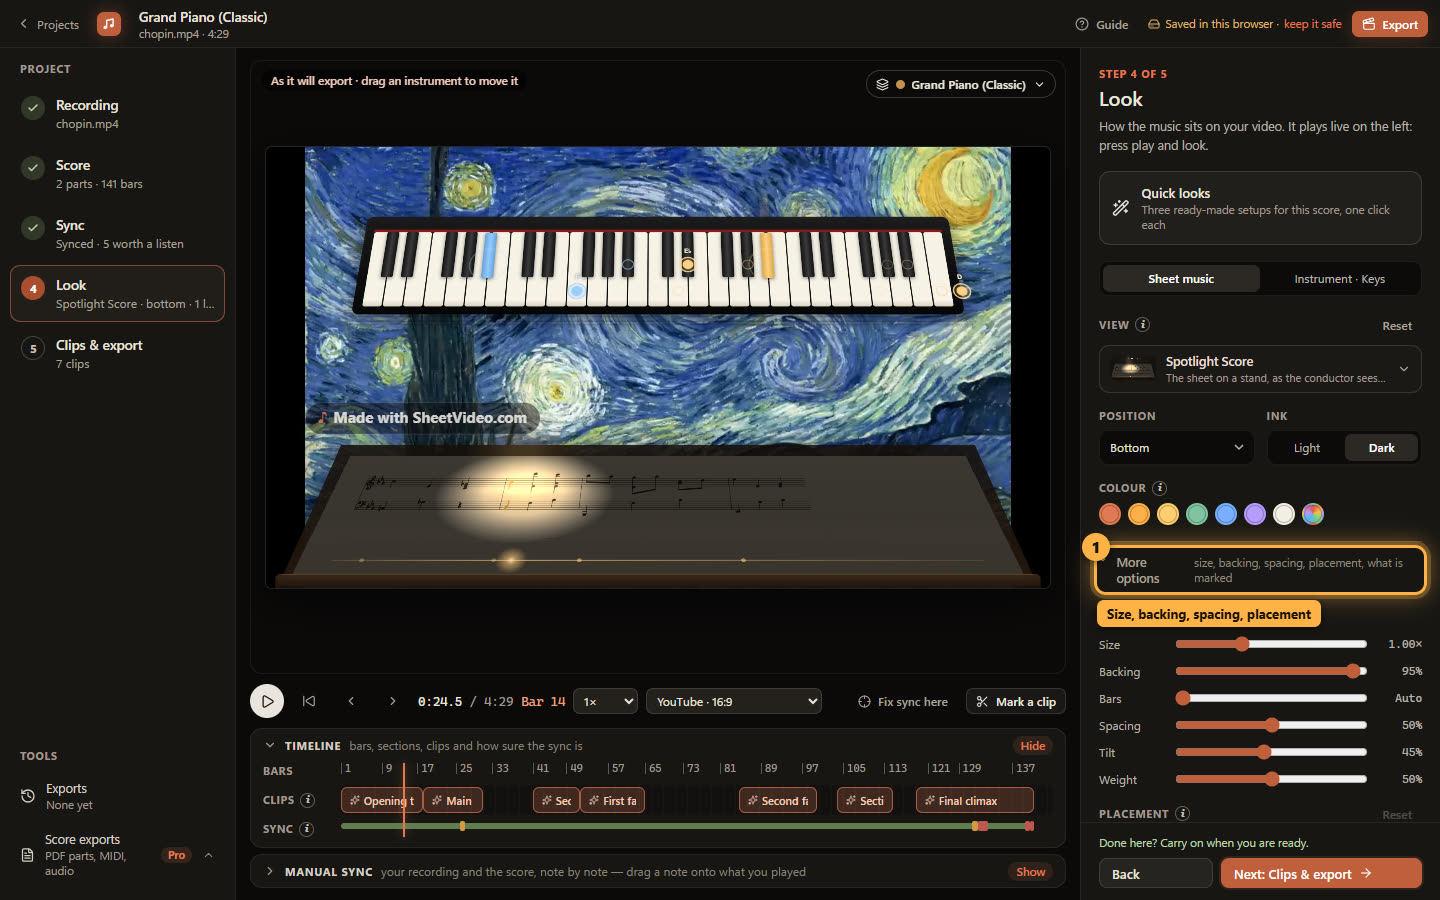
Here it is Spotlight Score: the sheet on a stand, as the conductor sees it. A spotlight follows the notes and the page glides up a line at a time, turning on the downbeat. The keyboard stays; it was a separate choice.
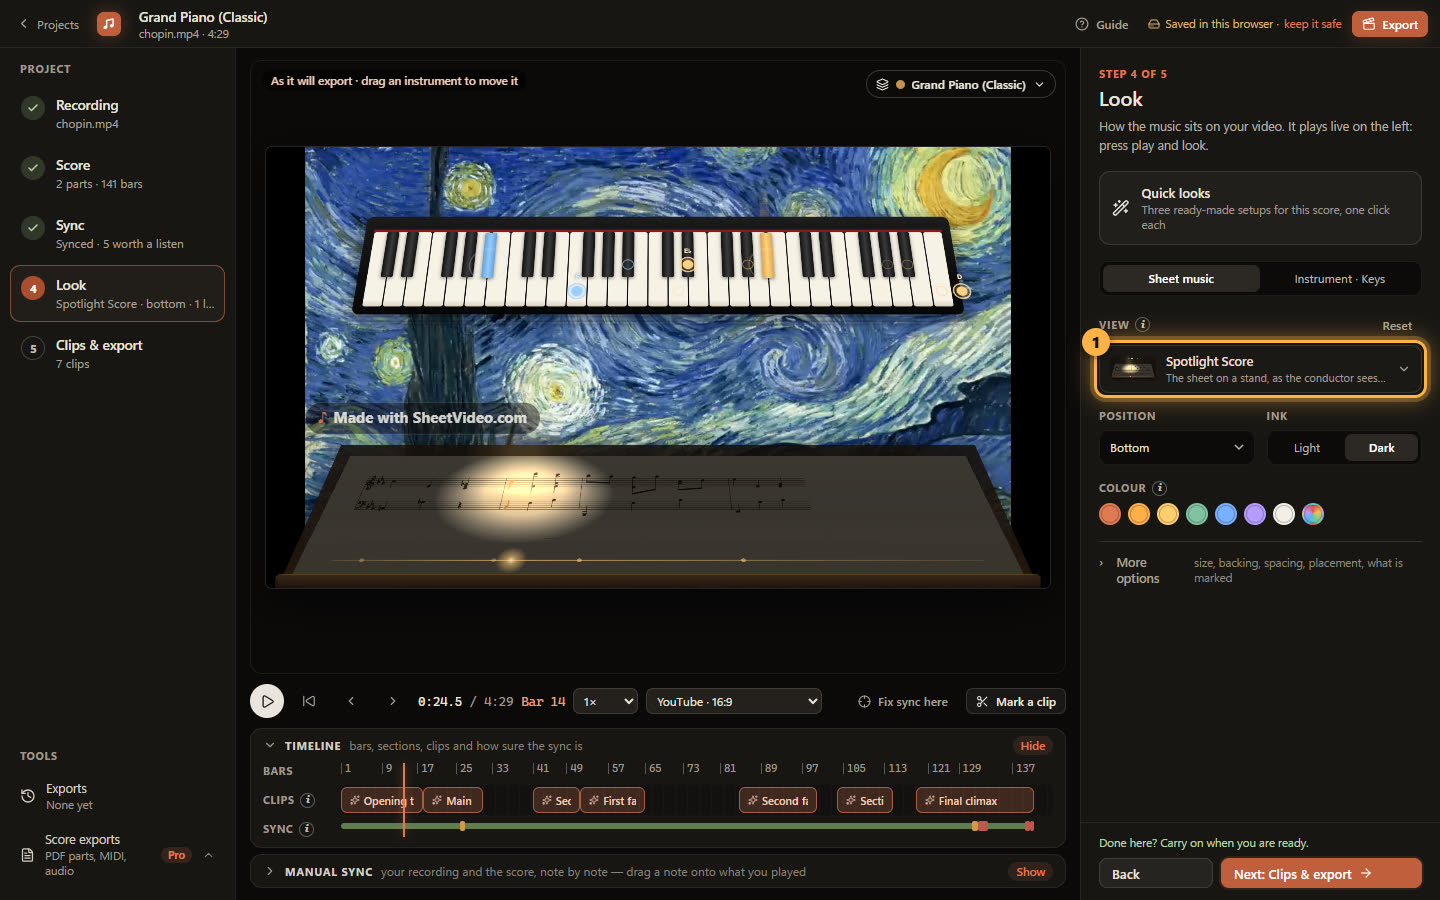
16The instrument and its look
The Instrument tab shows what plays along and the part it plays. The instruments offered are the ones that can play your part: keyboards for piano, a fretboard for guitar and bass, the drum views for drums, and the circle of fifths for anything with pitches.
Each has six looks — for the keyboard, Grand (the default), Neon, Upright, Synth, Chalk and Chart. Drag it on the video to put it anywhere.
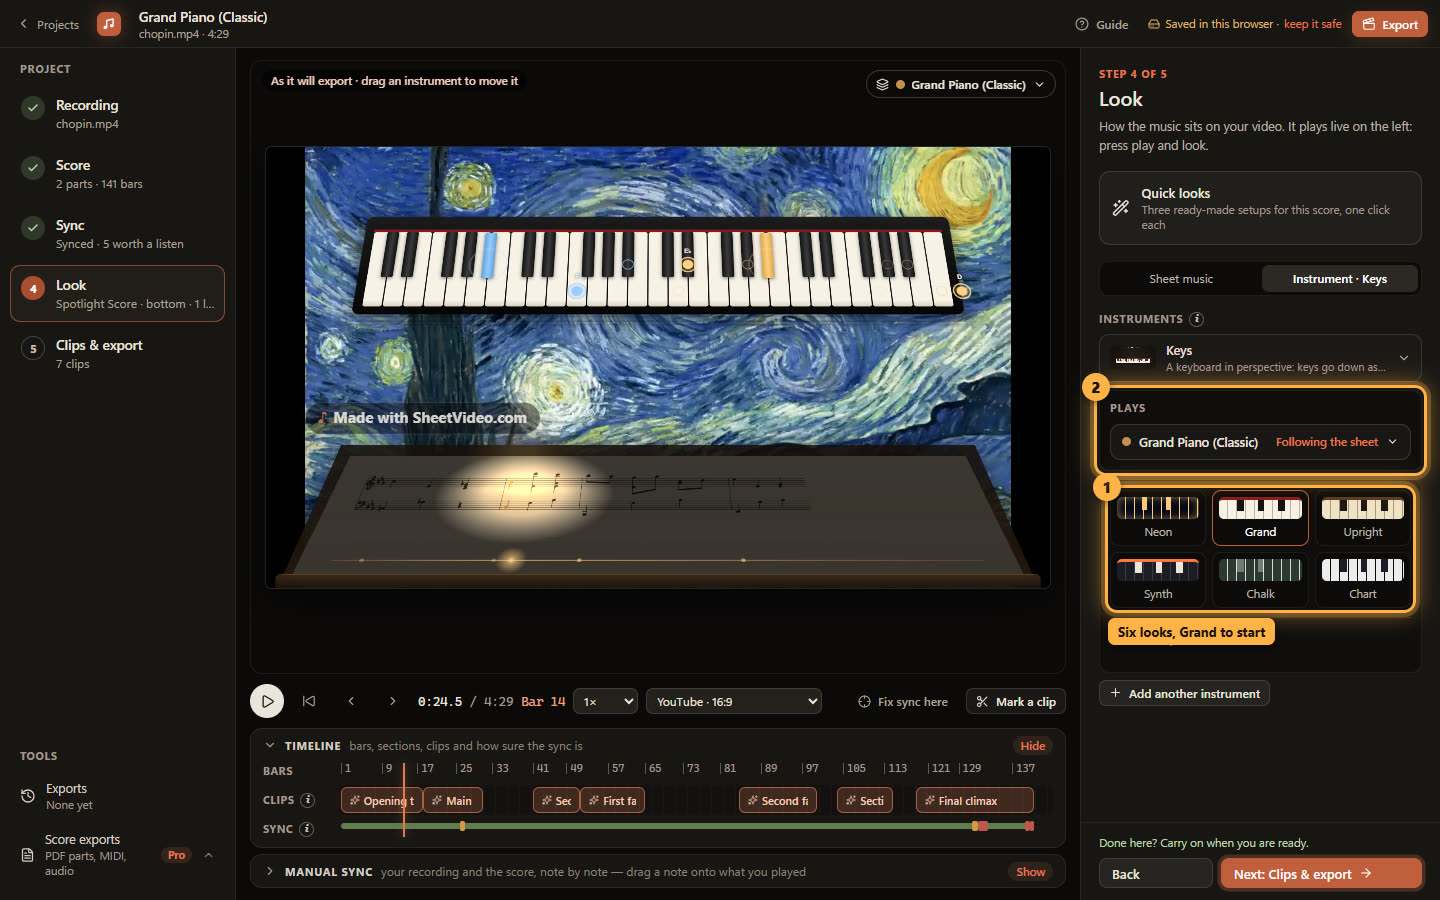
17Fine-tune it
On the Sheet music tab: position, one line or two, light or dark ink and colours. More options holds the rest — size, the backing behind the notes, bars per line, spacing, and for the moving views turn, lean and roll. The picture previews every change.
18Export it
On Clips & export the picture shows the new look in the shape you pick — here Reels 9:16, the page and the keyboard laid out again for the upright frame.
19And 16:9 for YouTube
The same look in 16:9: click YouTube under Made for, and export.