How to do it, click by click
Every picture below is the real SheetVideo editor, with what to click ringed and numbered. The example is a short Guitar Pro sample and SheetVideo’s own demo song for the instruments, and the Chopin Nocturne for the steps they share.
1Start a project and add the recording
Open SheetVideo and start a new project — there is no account to make first. The steps down the left are the whole job: Recording, Score, Sync, Look, Text & effects, and Clips & export.
Step 1 is the recording. Click Choose a video or audio file… and pick your take. MP4, MOV and WebM all work, upright phone clips as well as landscape, and so does an audio file on its own.
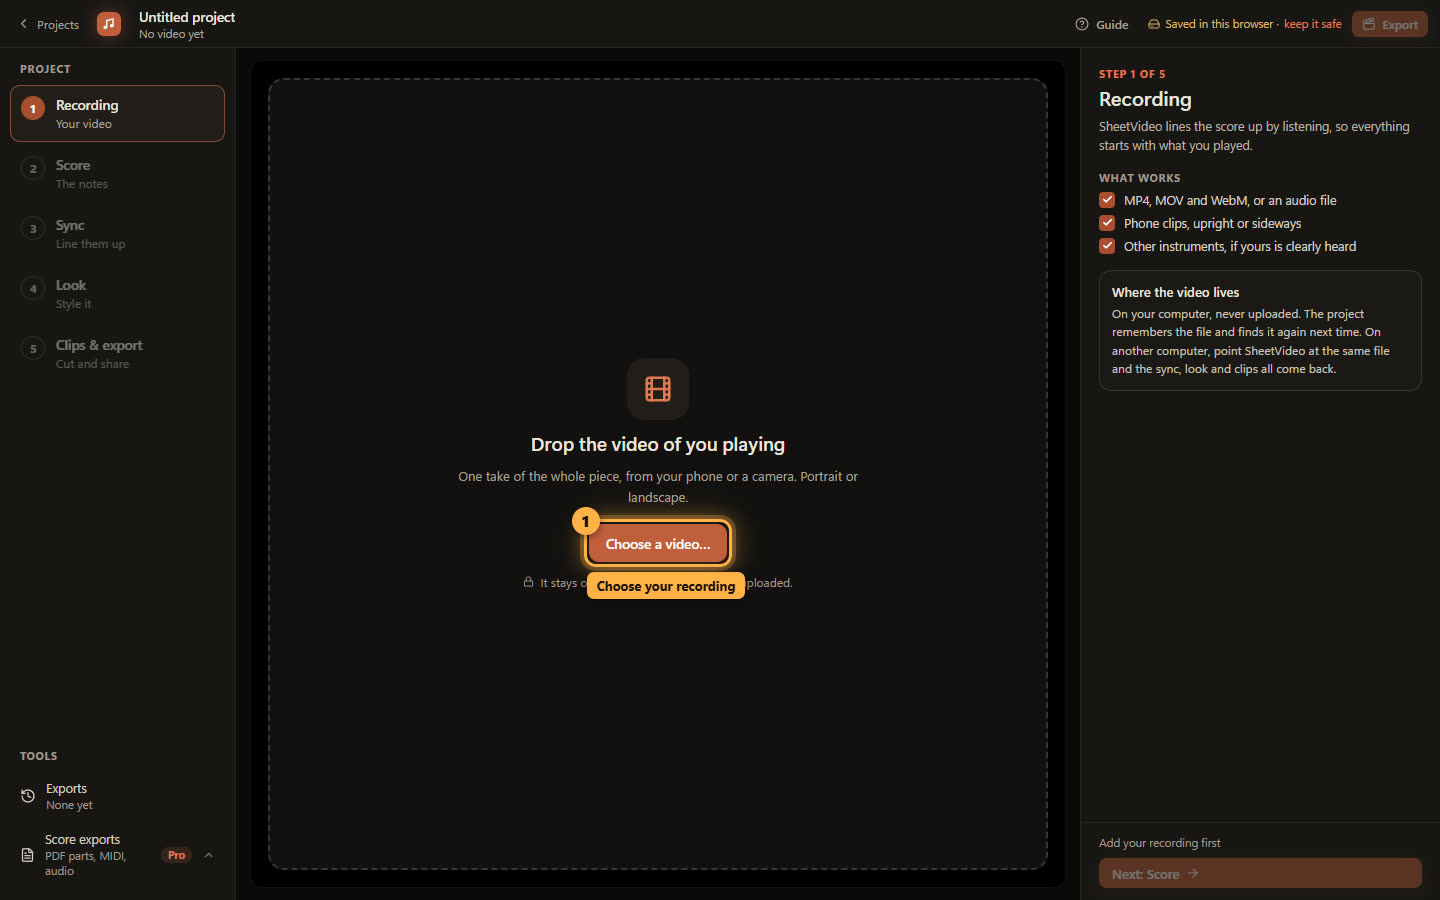
Step 1: Choose a video or audio file… The file stays on your computer — nothing is uploaded. 2Bring the score
Step 2 asks for the notes you played. SheetVideo needs them to know what to listen for — and they are what ends up drawn on the video.
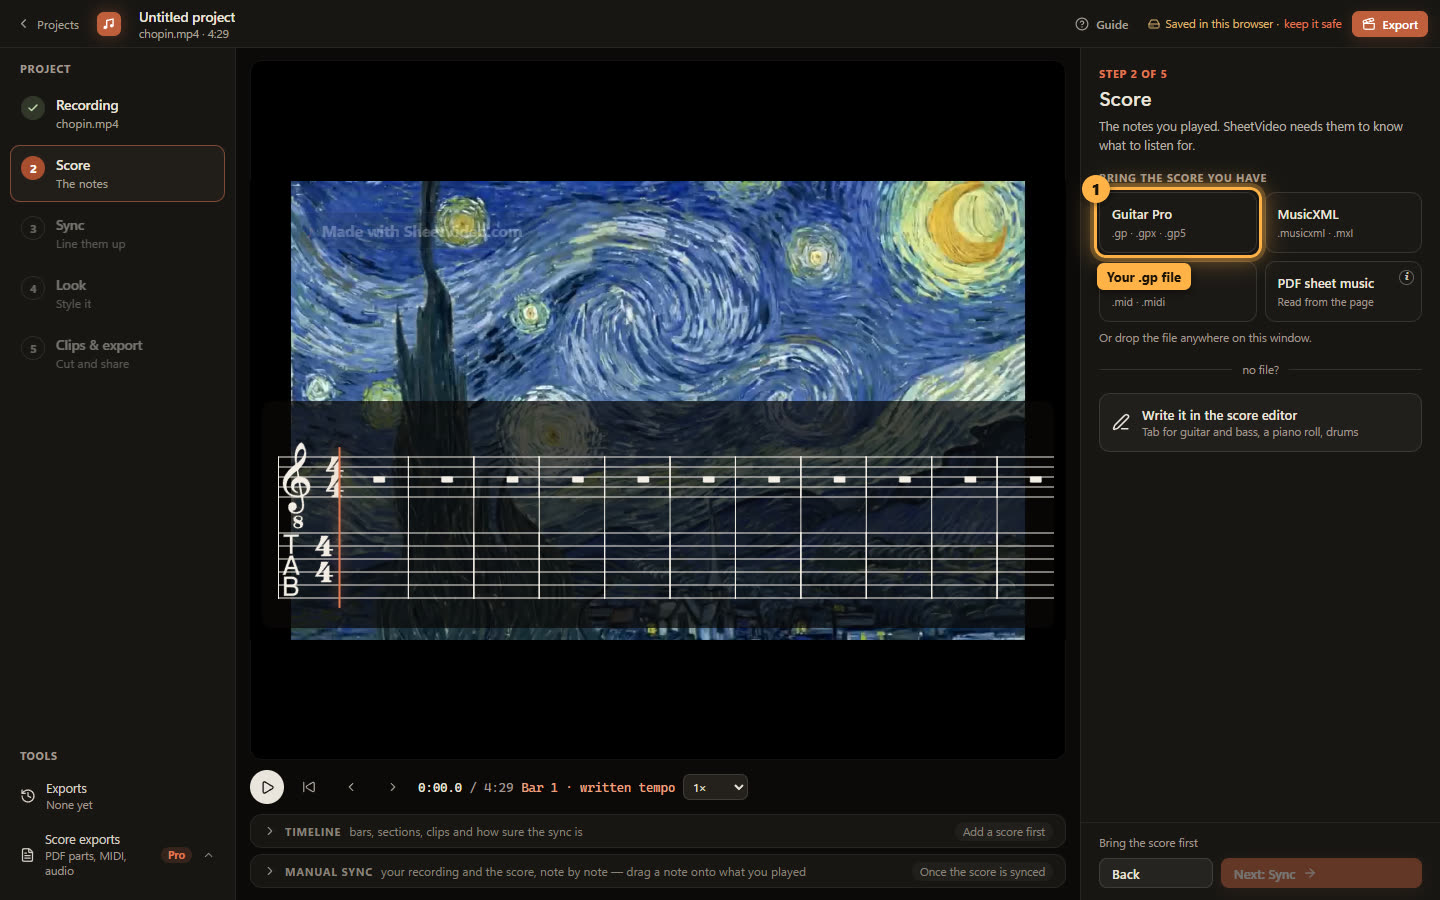
Click Guitar Pro and pick the file — .gp, .gpx, .gp5, .gp4 or .gp3. You can also drop the file anywhere on the window. No file at all? “Write it in the score editor” opens tab, a piano roll and a drum grid.
3Check the parts and the tab
A Guitar Pro file comes in with everything it knows: the tracks with their tunings and capo, the techniques, the tempo, and the sections, which appear as named markers on the timeline under the video.
Tick the track you played under “What did you play?” — that is what SheetVideo listens for — and the ones you want drawn under “What goes on the video?”. For a band arrangement that is usually your guitar in both.
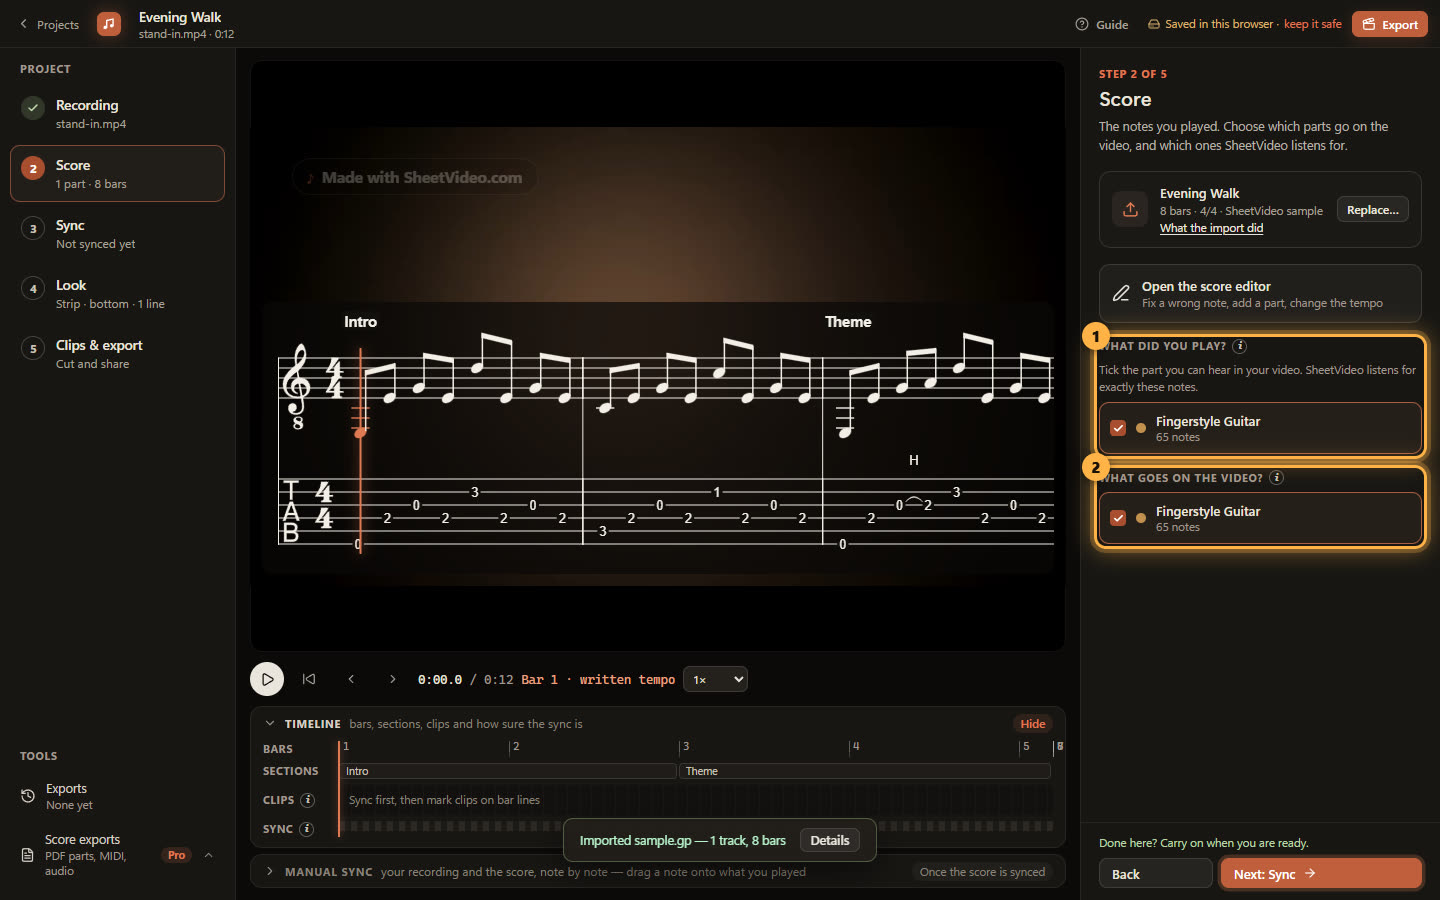
A short sample .gp file (8 bars, sections Intro and Theme) over a neutral stand-in clip. The sync and export pictures below are from the Chopin walkthrough. The steps are the same for a guitar, bass or band recording.
4Press Sync score to video
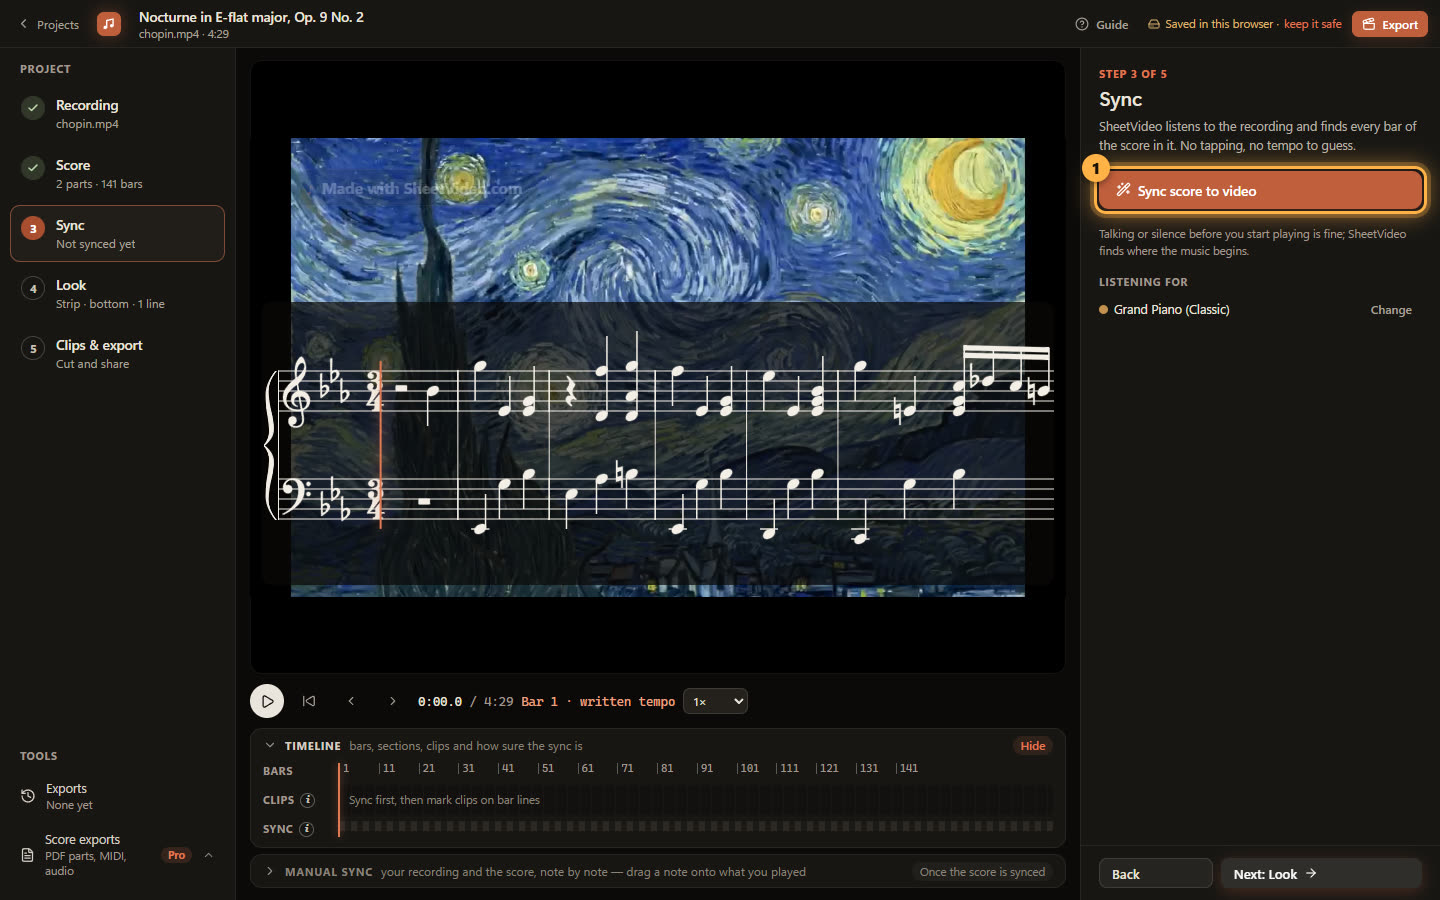
Step 3 is one button. Click Sync score to video.
Under the button it says what it is listening for — the parts you ticked on the Score step. If that is wrong, Change takes you back to them.
5Look at what it flagged
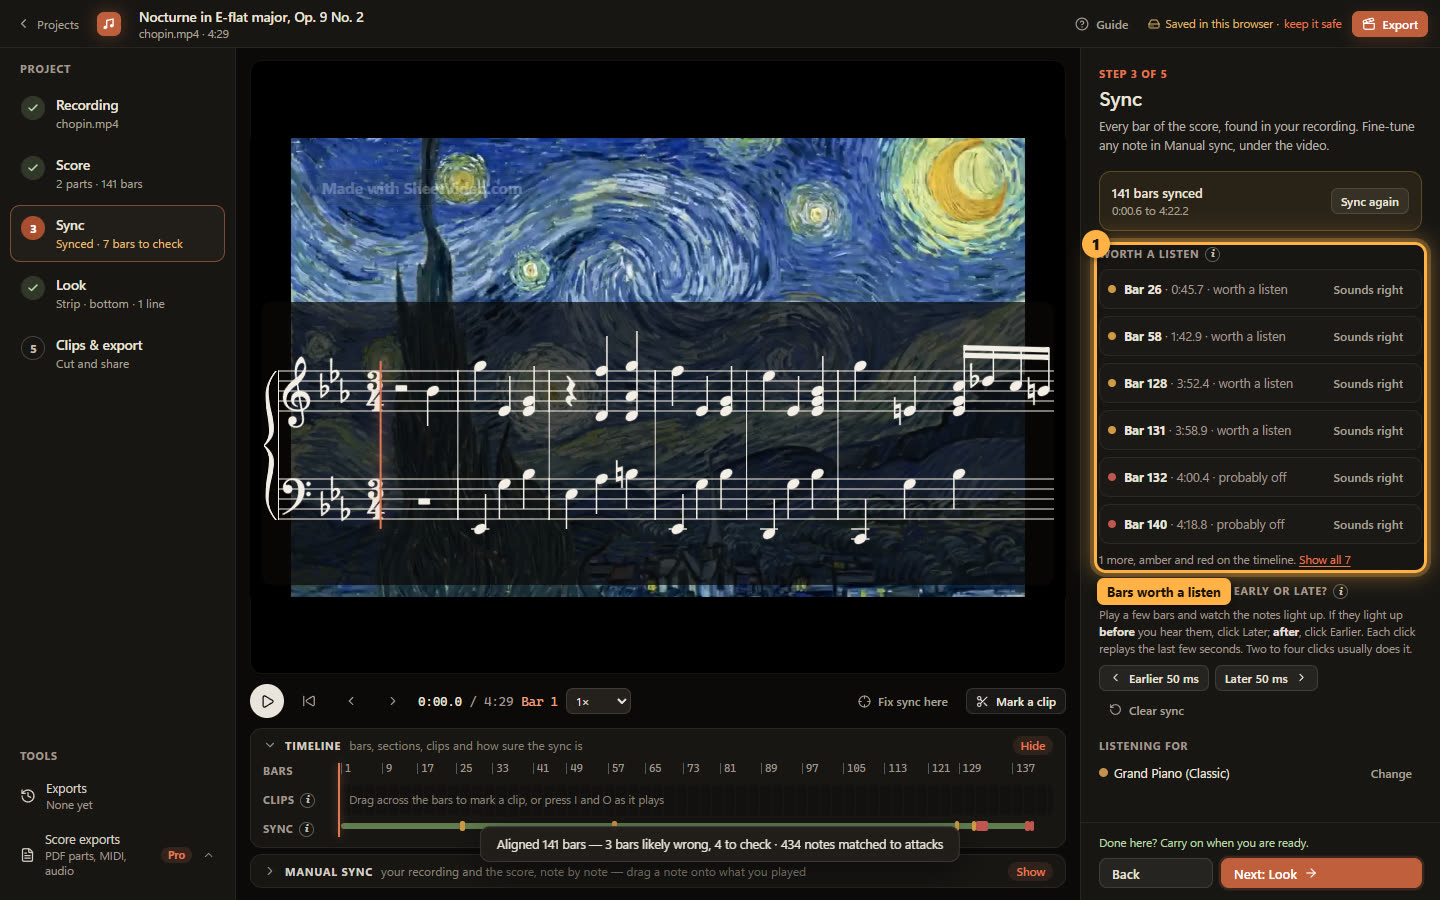
When it finishes, every bar has a place in the recording. The timeline under the video shows it: green where the sync is sure, amber and red where a bar is worth a listen.
The same bars are listed on the right with their times. Click one to jump there and listen; if it sounds right, click Sounds right and it drops off the list. In the Nocturne most of them sit in the closing bars, where the cadenza is played very freely.
6Choose how the score looks
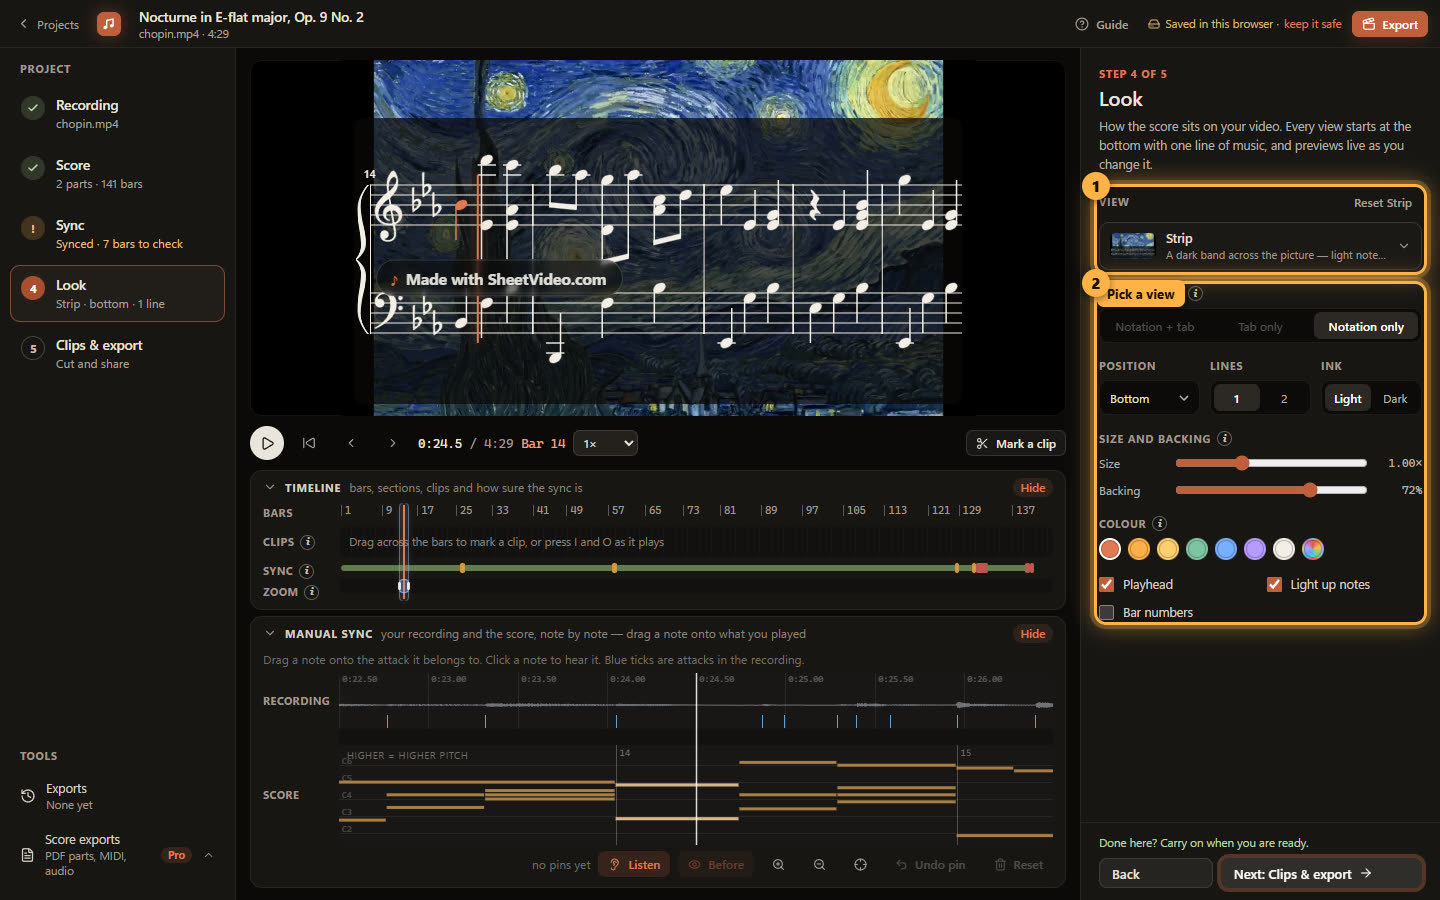
Step 4 is the look. Every project starts on Strip: a dark band along the foot of the picture with light notes, built to read on a phone.
Under the view are the settings it offers — notation, tab or both; top, centre or bottom; one line or two; light or dark ink; size, backing, colour; the playhead, the lit note and bar numbers. The video previews every change as you make it.
Between the two sits Instruments: a fretboard, a piano or a drum kit that plays along. It is a choice of its own, so any view of the sheet goes with any instrument, or with none.
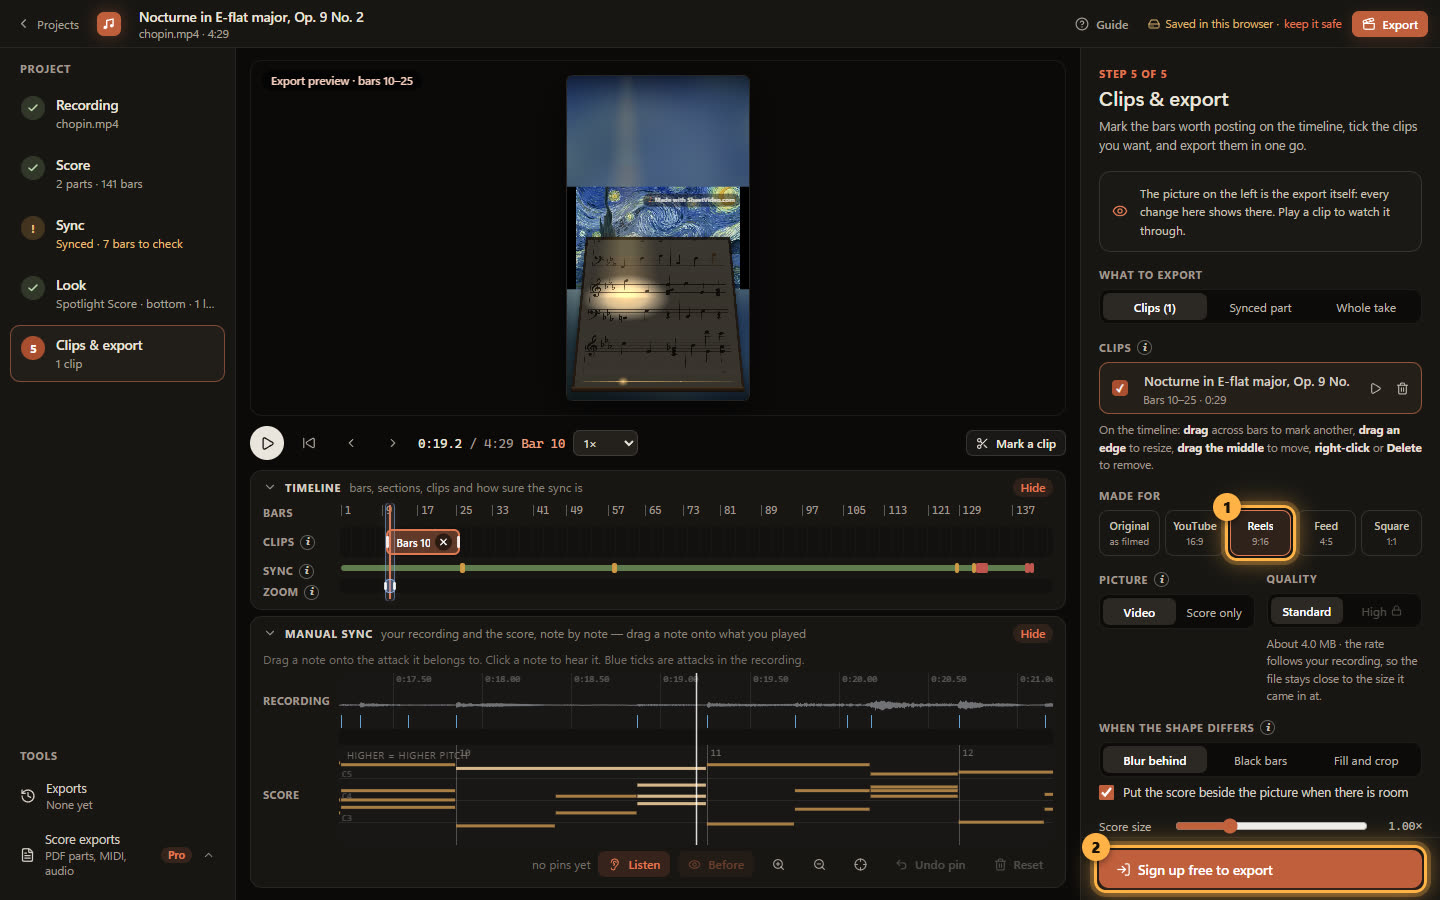
The picture is the export itself, in the shape picked under the video — Original, YouTube 16:9, Reels 9:16, the 4:5 feed or square. Pick it before you style, and what you set here is exactly what the file holds.
7Put the fretboard beside the tab
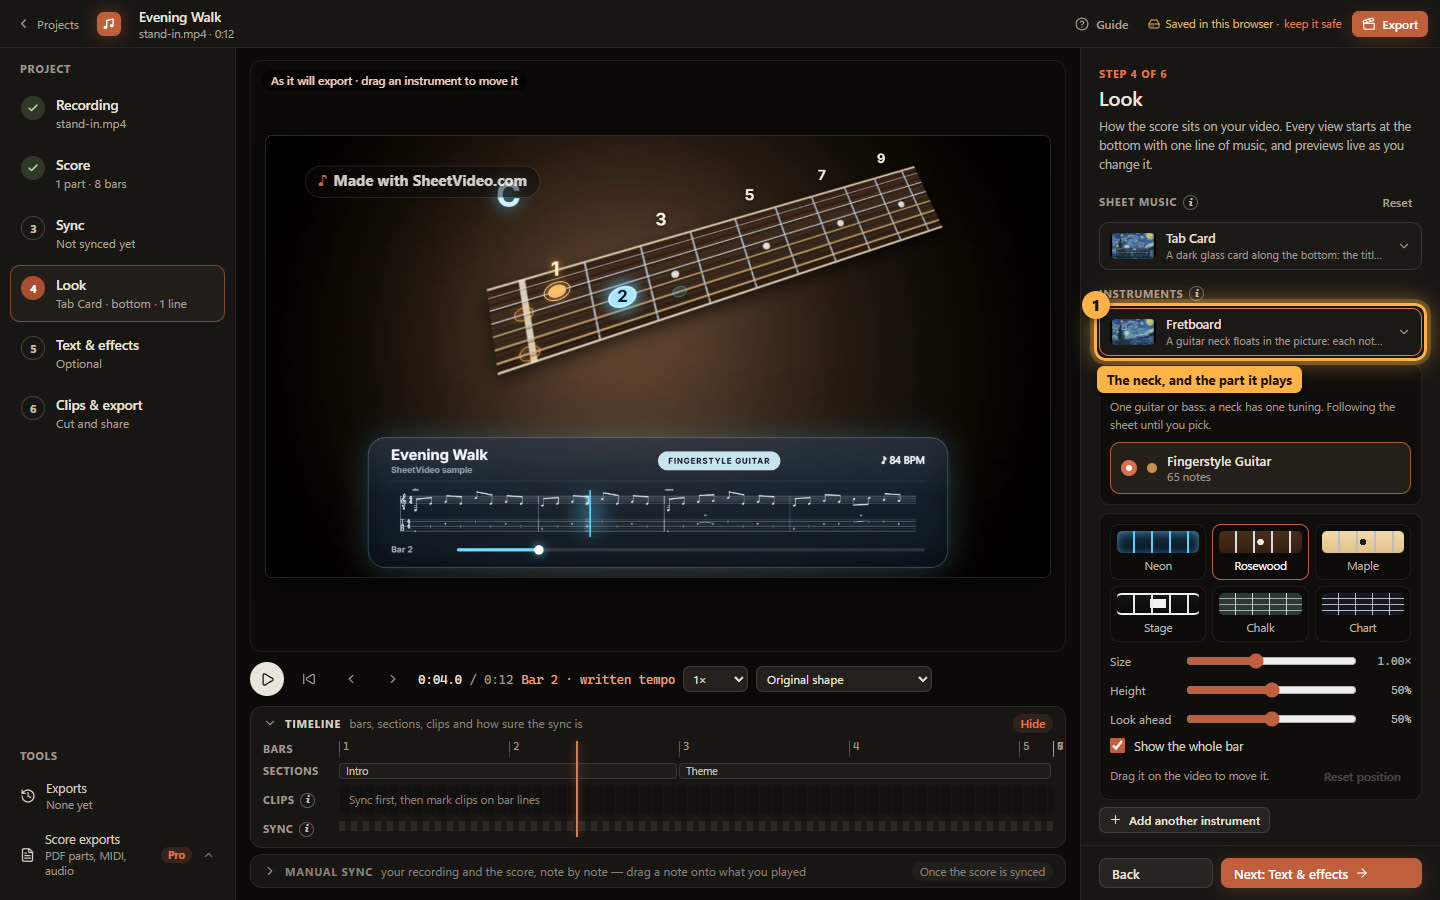
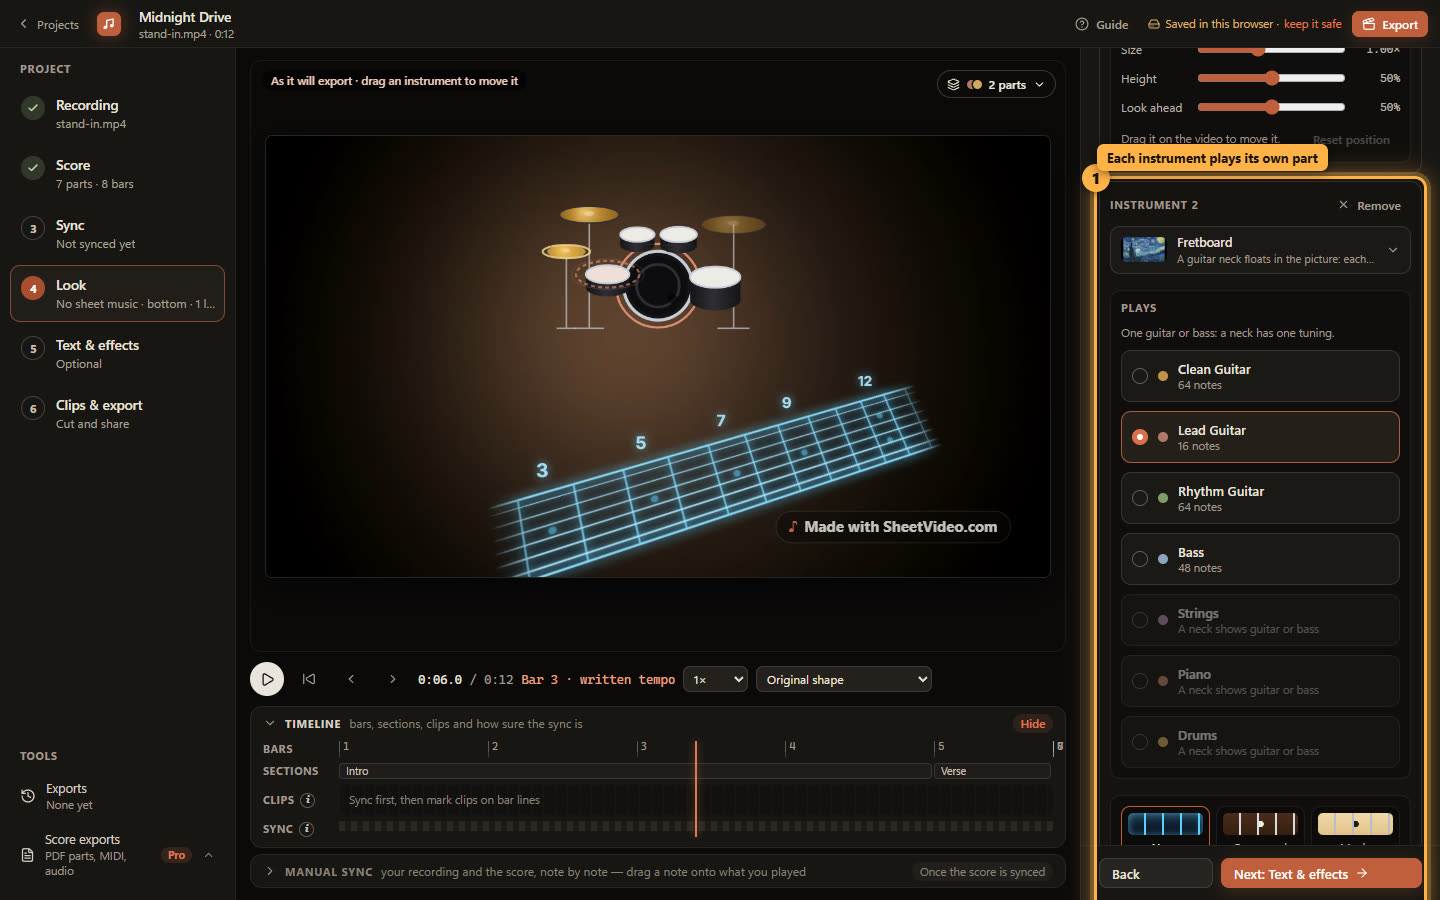
Pick Fretboard under Instruments. A neck floats in the picture, each note lying on its string and fret, the chord named above it and the next notes ringed.
A neck has one tuning, so it plays one part: SheetVideo picks the first guitar and lists the rest under Plays — click another to move it there. The six looks run from Neon light to Rosewood, Maple, a Stage neck, Chalk and a flat Chart for lessons.
8Add the rest of the band
Click Add another instrument and pick one more — here a Fretboard for the lead guitar over the kit. Each instrument is a card of its own with its own parts, look, size and place; the neck plays the Lead Guitar while the kit keeps the drums.
The Parts chip over the video, top right, shows every part on screen as a coloured dot and changes them without leaving the picture.
9Mark the part worth posting
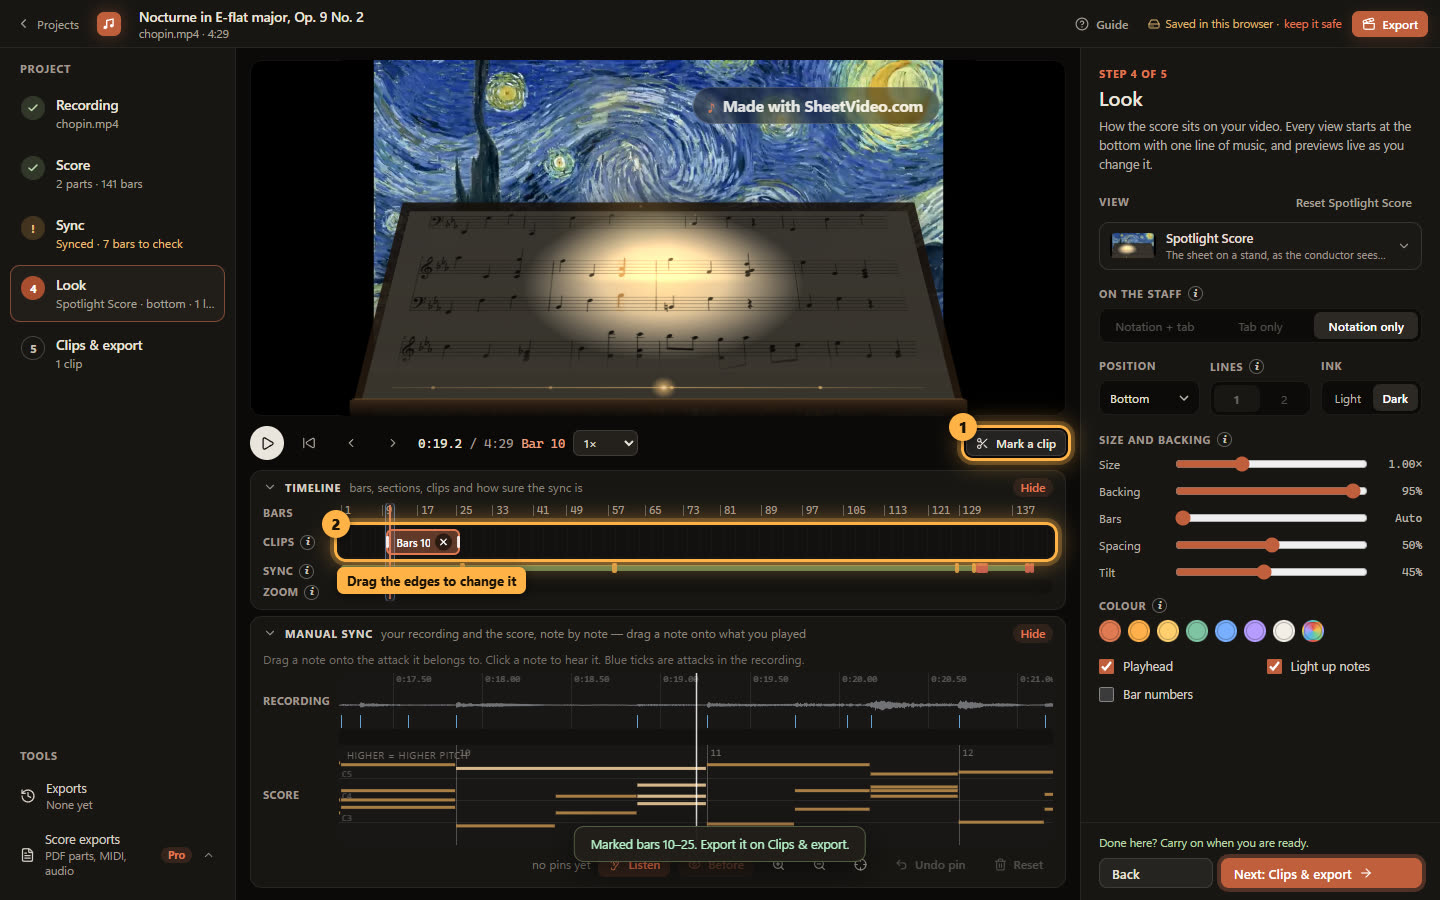
For a Short or a Reel you want the best thirty seconds, not the whole take. Stop the video at the bar where the clip should start and click Mark a clip under the video.
A clip of about thirty seconds appears on the timeline, starting on that bar — cut on bar lines, so it starts and ends on the music. Drag its edges to change it, or drag across the bars on the timeline to mark another. Every clip you mark is listed on the Clips & export step.
10Export it upright for Shorts, Reels and TikTok
Click Reels 9:16. A landscape video does not get stretched: it sits whole on a blurred copy of itself, or with black bars, or fills the frame with a centre crop — your pick under “When the shape differs”. The score is laid out again for the narrower frame.
Exporting needs a free account — sign up when you get here, and whatever you did as a guest moves into it. Free exports are up to 60 seconds with a small moving “Made with SheetVideo.com” mark; Pro exports the whole take without it.